Showing posts with label MasterPages. Show all posts

Sep 3, 2014

Using a Custom Logo in HTML MasterPages

The Eureka-moment of the day. I admit that I have mostly avoided this whole issue after the intial notion that it just did not work - mostly because I have avoided working with HTML MasterPages alltogether since I don't really like them; I'm much more at home working with the actual .master file (and mind you! it can also be used in a Design Package - that is, creating a Design Package does not mean that you need to use HTML Master Pages; rather, they are an option).

Today I was working with new labs for my Branding trainings and finally decided to take the bull by the horn and try my luck again at figuring out the proper way to actually get your own logo as default logo in the Site Logo snippet. And I did figure it out. It's really nothing new; I just hadn't thought about it this way before. 

If I create a VisualStudio Branding solution, I prefer the 15-hive over placing the files in _catalogs/masterpage. But as it goes, this is not avoidable in all situations, so I, too, have made solutions with all the assets in the MasterPage gallery. So today I gave this logo issue some more thorough thought and got it. The link in the snippet properties needs to be in the same form as it would in my own MasterPage, when the logo is located in _catalogs/masterpage.

In essence: for an HTML MasterPage, store your assets (logos, css stylesheets etc.) in your own folder in _catalogs/masterpage to ensure that they are packaged with the Design Package. When you use the logo in the Site Logo snippet, set the SiteLogoImage url in the following form:
<% $SPUrl:~sitecollection/_catalogs/masterpage/designpackagefiles/dp_logo.gif %>
(or <% $SPUrl:~sitecollection/_catalogs/masterpage/designpackagefiles/dp_logo.gif %>)


As for the CSS file link, that is much more straightforward. The href url can simply be of the form folder-in-catalogs-masterpage/stylesheetname.css, e.g.
<link rel="stylesheet" type="text/css" href="designpackagefiles/DesignPkgStyles.css">

Note, that the CSS link needs to be outside of all the MS-commented sections; the safe place for it is right before the closing </head> tag!

Mar 19, 2014

Discard AppWebs When Setting Custom MasterPages

I have long used a feature event receiver to set MasterPages throughout the webs (i.e. sites) in a site collection when my branding feature is activated, and also an inheritance event receiver to set the MasterPage for any new web when it has been provisioned. In SharePoint 2010, search sites required a different MasterPage than the rest of the sites, so in the code of the receivers, this was always taken into consideration, as you can see in the article linked above. In 2013, this is unnecessary as the same MasterPage goes for all sites, so I have used the simplified version of the receiver code, with no webtemplateid checks.

Or, so I thought. Turned out, my testing had been lacking, since I do not use apps in my development&test environment, and thus it had not occured to me, that the app webs (which I sort of assumed to be separate, but apparently are not) respond to these event receivers too. As tests proved, my receivers actually "broke the SharePoint" when appwebs were involved. So, a little improvement to both receivers here, checking that a web is not an appweb (APP#0, WebTemplateId == 17) before making any MasterPage changes:

Feature event receiver, activate feature:

SPSite site = properties.Feature.Parent as SPSite;
            if (site != null)
            {
                SPWeb topLevelSite = site.RootWeb;
                string WebAppRelativePath = topLevelSite.ServerRelativeUrl;

                if (!WebAppRelativePath.EndsWith("/"))
                {
                    WebAppRelativePath += "/";
                }

                foreach (SPWeb web in site.AllWebs)
                {
                    if (web.WebTemplateId != 17)
                    {
                        web.MasterUrl = WebAppRelativePath + "_catalogs/masterpage/mycustommaster.2013.masterpage.master";
                        web.CustomMasterUrl = WebAppRelativePath + "_catalogs/masterpage/mycustommaster.2013.masterpage.master";
                        web.Update();
                    }

                }
            }

Event receiver, web provisioned:

SPWeb newWeb = properties.Web;
            SPWeb topSite = newWeb.Site.RootWeb;
            if (newWeb.WebTemplateId != 17)
            {
                newWeb.MasterUrl = topSite.MasterUrl;
                newWeb.CustomMasterUrl = topSite.CustomMasterUrl;
                newWeb.Update();
            }
        }

For the sake of consistency, I also fixed the deactivate feature code to leave the appwebs alone.

Jan 10, 2013

Notes on Creating a SharePoint 2013 Branding Solution

Moving from SharePoint 2010 branding on to SharePoint 2013 branding is not that big of a change when speaking of the basics of a branding solution. Mostly, for a basic branding solution, you can pretty much follow guidelines stated in my blogpost Creating a Custom UI Solution for SharePoint. So in this post I will consentrate on the new stuff that SharePoint 2013 brings to SharePoint branding solutions.

New MasterPages

With a new SharePoint version, come also new MasterPages, with differences in both technology and design considerations (HTML5, CSS classes...). So, to get started with creating your 2013 targeted branding solution, you can either copy Oslo or Seattle and start with those, or do the (in my opinion) slightly easier approach and download the 2013 Starter Masters by Randy Drisgill and use those (read the instruction on the page before using).

One cool thing about the 2013 MasterPages is that the same MasterPage applies to search sites too so you don't need to be creating a separate one for that anymore.

Location of design files

In SharePoint 2010 the common way was to delpoy design files, such as images and the CSS and JavaScript files in either the Layouts folder (mapped folder) or Style Library. In SharePoint 2013 the location for all design files is the MastePage gallery. Adding design files to the gallery is done in the same way as adding MasterPages to the gallery. Set the content type to Design File.


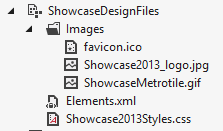
Note the url to the files in the MasterPages Gallery (with the exception of the icon and tile image files, that need be referred to with a simple url /_catalogs/masterpage/mydesignfiles/favicon.ico):


You can also use the mapped Layouts folder like before, but the reference path to the virtual directory has changed; instead of the simple
_layouts/MyDesign/mysstyles.css
you need to insert '15' in the path (note: do not manually add it in the mapped folder structure in VisualStudio, only in the reference path):
_layouts/15/MyDesign/mysstyles.css

Device Channels

As stated in my earlier post(s), you can create separate MasterPages to be used with different devices and add device channel panels to Page Layouts to target content to specified devices. Even though it might be called for in some occations and a good practice in many, I would recommend to at least consider responsive design of your MasterPages and Page Layouts instead. It is not only easier to implement (no need for manual setup), but also more efficient in the wolrd of a million plus one different devices, when instead of differentiationg between OSs or browsers, the pages adapt to different resolutions fluently.


Dec 10, 2012

How to Create an HTML MasterPage for SharePoint 2013

As I have stated before, HTML MasterPages are one of the big new things in SharePoint 2013, and even if they are not always the preferred option, it may prove handy in some cases (a bit of exploration of that topic in my previous article). So the question is: how to actually go about it?

1) Create your HTML structure
You can create the basic structure of the master page in any HTML editor of your liking, more or less forgetting about the SharePoint aspect altogether. I say more or less, not completely, because you need to understand what a MasterPage is, essentially, what its function is.

A MasterPage contains the basic structure of the pages, the wireframe of where elements are on every page. In SharePoint, it can also contain some controls like navigation and site logo and search. These controls are later added as snippets to the MasterPage. What you need to do now, is create the wireframe as an HTML page. 

Example (HTML5):

<!DOCTYPE html>

<html>
<head>
    <meta charset="utf-8" />
    <title></title>
<link type="text/css" href="DemoStyles.css" />
</head>
<body>
    <header>
        <div id="sitelogo">[site logo control here]</div>
        <div id="headerright">
            <div id="subtitle">Company A Intranet</div>
            <div id="searcharea">[search control here]</div>
        </div>
    </header>
    <nav>[top navigation control here]</nav>
    <section id="mainarea">
        <nav>[left navigation control here]</nav>
        <div id="pagebody">
            [ContentPlaceHolderMain here]
        </div>
    </section>
    <footer>
        <span>Company A Intranet</span>
    </footer>
</body>
</html>


2) Create your CSS stylesheet (and graphics etc.)
You can test your site UI by adding the references to your stylesheet (and graphics) on the HTML page while still stored in your filesystem; simply change them later if the relative paths change after uploading everything to the server.

3) Upload your files to the server
Navigate to the top level site settings in your SharePoint Site Collections and open the MasterPages library under Web Designer Galleries category. Click Upload Document in the Ribbon, and browse for your HTML file and click Upload. Select HTML MasterPage as the Content Type of the file.


You can also add your CSS Stylesheet reference in the information form.

Upload your stylesheet and graphics as Design Files. You can create a separate folder for them too.


4) Convert your HTML file into a MasterPage
Navigate to the Design Manager in Site Settings, under Look and Feel and select Edit Master Pages. Note your HTML MasterPage in the list.


It still needs to be converted into a .master MasterPage, so click on Convert an HTML file to a SharePoint master page and select your MasterPage from the gallery.


Click Insert and SharePoint will convert your HTML page into a MasterPage, showing the MasterPage status as "Conversion successful".

Click on your MasterPage to open it in Preview.

5) Open your HTML MasterPage file for editing
You can either download a copy of the converted .html file from the MasterPages gallery or open the Top Level Site for editing in SharePoint Designer 2013 where you can edit the file on the fly and see the changes in the preview right away.


In SharePoint Designer: click to open the file, then click the Edit file -link.

You can see that with the conversion, SharePoint added a whole lot of code in the HTML version of the file in addition to creating the .master file. Do not delete the code added by SharePoint!

6) Add snippets to your .html MasterPage
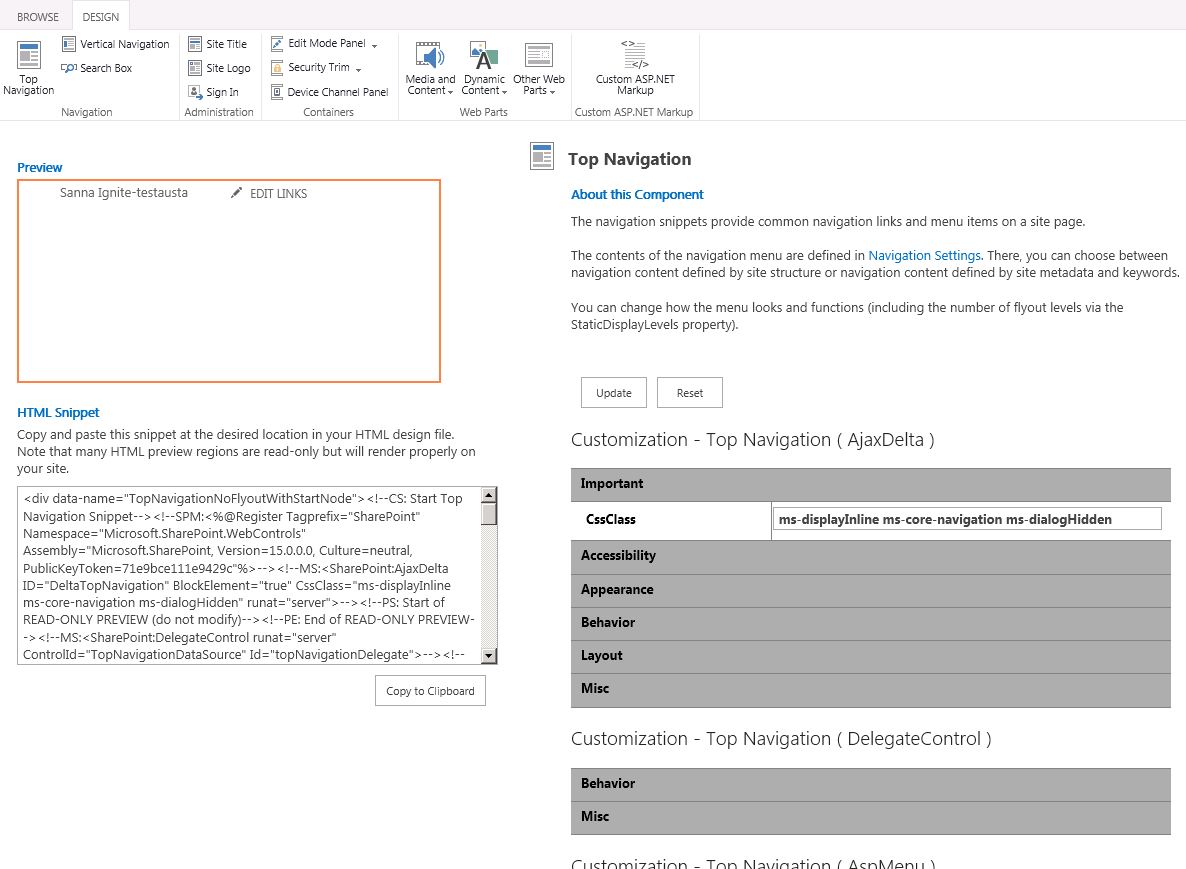
In the browser, open the file in Preview, if you did not do this yet. Then, click on Snippets in the upper right hand corner of the Preview page.


This opens a new tab in the browser for selecting and customizing the snippets, i.e. the SharePoint controls.


Pick the snippet on the Ribbon, customize it as needed, then click on Copy to Clipboard and paste the code in the appropriate place in the HTML file.


If you are working in SharePoint Designer, save changes and refresh Preview to view the changes made by insterting the snippets.

When you are ready, save and close the HTML file and return to Design Manager in the browser.

7) Publish your design files
Navigate to the MasterPages gallery and publish your files. Your MasterPage is ready to be used.


Nov 30, 2012

Going HTML with MasterPages?

One of the big new things in SharePoint 2013 is option too create MasterPages as plain old HTML files and let SharePoint then convert them to .master files, adding all necessary asp.net code into the file. How this works, is that basically any web developer can create a master frame in HTML, without needing to worry about the SharePoint specific stuff at all at that point. Then that file can be converted in SharePoint, and the needed SharePoint controls can be added to it as ready-made snippets.

As a professional doing SharePoint branding solutions, my first question here was "why? why would I want to do it like that?" And after trying it out, I concluded that most probably in most cases I wouldn't. But it doesn't mean that someone else wouldn't.

Let's take a look at this scenario:

There is company A who decides to go into SharePoint Online with their intranet site. They use an advertizing company B in all their design, web and otherwise. So with this new intranet project they turn to their ad company B for a fresh design for the intranet in Office 365 SharePoint Online.

With 2010, what would've happened is that the ad company B would've made a nice intranet site design, which would've been delivered to company A as image files and probably a PhotoShop layout file. The company A would've partenerd up with company C to create the branding for the site as a sandbox solution since you cannot deploy farm solutions to SharePoint Online.

With SharePoint 2013 one would need to rethink the usage of sandbox solutions: Microsoft claims in msdn and technet articles that sandbox solutions have been depracated in SharePoint 2013 [edit. Jan.3rd 2013: this information does not exist anymore], but there is controversial information around the interwebs about whether they actually are dead or not. Be as it may, we pretty much ought to forget about creating a sandbox branding solution for SharePoint 2013. So then, what are the options?

  1. The ad company B designs the layout as a PhotoShop file, delivers it to company A, who then delivers it to company C where the branding dude creates a MasterPage out of the layout file. And if and since sandbox solutions are out of the equasion, the branding package will most probably be created as a Design Package. (Stay tuned: I will be posting an article about them too sometime in the near future)

    The branding dude (or dudette ;) ) here has an option: (s)he can either go with a .master MasterPage, or create an HTML MasterPage and use the SharePoint conversion and the snippets provided by SharePoint in Design Manager.
  2. The ad company B has a web designer who goes to the extent of creating the HTML frame (and probably also the CSS style sheet) and delivers these to company A together with all the graphics that are needed.

    Now, if company A happens to have an employee, who understands enough both SharePoint and HTML (and CSS) to go through creating the Design Package himself, probably the task would stay in-house. Pretty much the same way as some companies have created their SharePoint (Online) 2010 UIs with SharePoint Designer 2010 when there was a capable person on the payroll.

    If they don't have the recourses to do this in-house, then the HTML and CSS etc. would again need to be delivered to company C, to the hands of the branding dude(tte). And then again, (s)he would still have the choice to extract and import the HTML to a .master or to use the HTML as is and let SharePoint take care of the conversion.
On both occasions, I have stressed the still standing option of creating and using a .master instead of the HTML with the snippets. The reason behind this is that I don't see the latter option necessarily as the best one when the one creating the MasterPage is actually capable of doing it the old-fashioned way. Why is this?

Because, even though the converted HTML Master is a completely valid MasterPage, and the snippets relatively easy to add per se, the process is not an altogether simple one. 


The look and feel of the controls can be customized before copy-pasting the code snippet to the MasterPage. But this creates a whole lot of inline styling to the control, on the MasterPage, so if later on company A decides to do a facelift to their site, instead of some centralized changes in the CSS file, the actual MasterPage needs to be edited.

With this, I also encountered a problem that if I changed the inline code straight on the MasterPage, my changes did not take effect; I needed to customize and copy-paste the snippet all over again (don't know if that was some bug of that specific environment; it was RTM, though).

You can preview the MasterPage in the browser while working with the snippets. But in order to do that, you need to open the converted HTML file for editing ( edit the masterpage, you DO NOT open the .master file). 

Which means that you need to open the file form the Master Pages and Page Layouts Gallery. Unfortunately there still is no way to open a file for editing if you open this gallery in the browser (like the Design Manager suggests), so you are faced with a few options:
  • you can download a local copy of the HTML file, insert the snippets, save locally and occasionally upload a new version of the file to the gallery. This takes away from the instant preview, though.
  • you can map the gallery as a network drive in your Windows Explorer. This may not be the first thing I would reccomend, but it allows you to open the HTML file in your preferred HTML editor, whether it be Notepad or Dreamweaver or Expression Web or whatnot - but not SharePoint Designer 2013, not with this option.
    This enables the instant preview since you are editing the file straight from the gallery.
  • you can open the Site Collection in SharePoint Designer 2013, navigate to the Master Pages Gallery and open your HTML file for editing in SPD. This prevails the instant preview. But remember, there is no wysiwyg editor in SharePoint Designer anymore in version 2013.

After tackling these two issues in a satisfactory manner, you are well on the track with creating the MasterPages as HTML instead of using Visual Studio to create .master files. There is a time and a place for everything, and that applies to HTML MasterPages too. Oh, and mind you: the Design Manager is only available on publishing sites (or when publishing infrastucture is enabled).


Apr 26, 2012

SharePoint UI Version5

Some 6 months or so ago I downloaded this demo MasterPage v5 zip, i.e. a package containing a MasterPage done in HTML5 format, CSS3 used for styling and some JavaScript to make the UI responsive and adapt to different devices and size of screens. I have been so wrapped up in other stuff, that I tried it out first time only this week, to demo it in the seminar on Tuesday.

The example is quite cool, featuring most of the general branding scenarios, and triggered the onClick in me, starting the learning-by-doing process. In a sense, I have long known how to go about it, but never have really taken it to my core line of work, to implement the stuff in SharePoint. So off to work I was, and as for here and now, welcome yourself to some notes on how to make it happen.

As for the MasterPage, you can build it more or less the way you always have, for HTML5 understands all of the old fluently. But, if you really want to use HTML5, you might want to rethink the normal DIV repertoire and replace some divs with the new elements, e.g. HEADER, HGROUP, SECTION, FOOTER, NAV, to mention the most probably needed ones. One thing to keep in mind though, is that section != div. You still need the divs. Sections are more general semantic element.

My basic structure for the MasterPage looks like this (after the basic workspace and bodycontainer divs, and discarding all the rest of the SharePoint stuff like page editing status bar etc.):

<header>
  <hgroup> <!-- in my case this is a bit unnecessary though, since my top nav is outside the header -->
    <!-- several divs for sitelogo, search etc. -->
  </hgroup>
</header>

<nav id="topnavi">
  <!-- global navigation -->
</nav>

<section id="contentwrap">
  <nav id="lefnavi">
    <!-- left navigation -->
  </nav>
  <div class="s4-ca with-leftnav" id="MSO_ContentTable">
              <!-- mso_contentdiv required, helps SharePoint put the web part editing pane in the main body on the right -->
        <div id="MSO_ContentDiv" runat="server">
                  <!-- page content loads from the pages and pages layout -->
                  <asp:ContentPlaceHolder ID="PlaceHolderMain" runat="server" />
        </div>
    </div>
</section>

<footer>
  <!-- divs for footer content -->
</footer>

Oh, and note the HTML5 Doctype and HTML tag (for MasterPage), simply with no schema declarations:

<!DOCTYPE html>
<html lang="<%$Resources:wss,language_value%>" dir="<%$Resources:wss,multipages_direction_dir_value%>" runat="server" __expr-val-dir="ltr">

As for the CSS, many things are just the same as with XHTML. But then there's a lot more you can do. Plus things to do to maintain the backwards browser compatibility! Without any regard to this, this is what you might get
in IE9 and any other current browser:


and this is how it looks like in IE7 (IE8 isn't much different but at least it understands floats!):


So how to go about it? I will point out some of the things I did with this UI of mine, and how to make them work in the older browsers as well:
  • The general older browser fix is to set the SECTION, HEADER etc. to display:block by default in your CSS
  • In my styling the trickiest parts are the drop shadow of the header and the selected link, the rounded corners, the opacity used in almost all backgrounds and the gradient background of the whole workspace. They currently require several different targeted rules in order to fly in all browsers.
  • Let's start with the gradient background. "Simply" apply CSS rules for all different browsers, using the ms filter fix to make it happen also in IE7/8 (already implemented in the picture above):
    background: #fff;
    background: -moz-linear-gradient(top, #7e8598 0%, #fff 75%);
    background: -webkit-gradient(linear, left top, left bottom, color-stop(0%,#7e8598), color-stop(75%,#fff));
    background: -webkit-linear-gradient(top, #7e8598 0%,#fff 75%);
    background: -o-linear-gradient(top, #7e8598 0%,#fff 75%);
    background: -ms-linear-gradient(top, #7e8598 0%,#fff 75%);
    filter: progid:DXImageTransform.Microsoft.gradient( startColorstr='#7e8598', endColorstr='#ffffff',GradientType=0 );
    background: linear-gradient(top, #7e8598 0%,#fff 75%);
  • Then there are the rounded corners. As for most browsers, they can be done in a combo way of several rules, e.g. my header corners:
    border-radius: 10px;
    -webkit-border-radius: 10px
    -moz-border-radius: 10px;
    -o-border-radius: 10px;

    As for IE7/IE8, they won't be round unless you want to use e.g. the htc fix or some code, such as CurvyCorners - see this pretty good article on rounded corners. 
  • The header also has a drop shadow. For most browsers, you need a similar set of rules as the corners:
    -webkit-box-shadow: -1px -5px 5px rgba(0, 0, 0, 0.5);
    -moz-box-shadow: -1px -5px 5px rgba(0, 0, 0, 0.5);
    -o-box-shadow: -1px -5px 5px rgba(0, 0, 0, 0.5);
    box-shadow: -1px -5px 5px rgba(0, 0, 0, 0.5);

    and then the filters for IE7 and IE8 - they don't make as fancy a shadow though, so I simply left it out of the final UI:
    /* for IE8 */
    -ms-filter: "progid:DXImageTransform.Microsoft.Shadow(Strength=5, Direction=45, Color='#333333')";
    /* For IE 5.5 - 7 */
    filter: progid:DXImageTransform.Microsoft.Shadow(Strength=5, Direction=45, Color='#333333');
The IE8 version of a shadow:
  • Then there is the transparent background color. As for the CSS3 compatible browsers, this is quite simple:
    background: rgba(255, 255, 255, 0.95);
    the last decimal number being the opacity value.
    As for IE7 and 8, there's ways of doing this, some of them work, some of them didn't seem to. I decided to make things easy for me and go with solid colors for older browsers.
Add some multiple backgrounds and stuff, and there's more to do, this was just the basics for this site. I suppose we're getting there, but (ok, I know I'm repeating myself now) until we're done with IE8 and older + the other browsers start to all implement the standard CSS3... unh...

For more information and HTML5 + CSS3 tutorials, see e.g. w3Schools tutorials. And besides these, there are many other good ones for HTML5 and CSS3. I myself found e.g. the Impressive Webs quite cool, not a conventional tutorial really, but having many cool tips and info in edible bits.

Apr 25, 2012

Tip of the Day: Intellisense for MasterPages

How ignorant can you sometimes feel? All the time while working with SharePoint 2010 MasterPages and PageLayouts in VisualStudio, for two years now, I have been cussing the lack of intellisense on those pages on a regural basis. I have even complained about this out loud and asked advice from others - never finding or getting any solution to this.

Then, only last Friday, I was helping out a guy who is relatively new to SharePoint branding and development etc. and had been trying out this and that in VisualStudio to help him get along - and avot! He had found the solution to the problem. Maybe it is old stuff to you already, but it was a life-saver for me!

In the Solution Explorer, right-click on the MasterPage/PageLayout file missing intellisense, select View Markup. That does it, pals!

Jan 18, 2012

Setting MasterPages to Sites Automatically

I have addressed this topic before in the article Automatize MasterPages in SiteDefinitions, but taking a little bit different viewpoint here, let's take a look at how to achieve this without custom Site Definitions. There are cases where custom Site Definitions are needed, of course, and in those cases, the feature stapling as described in the other article might be the way to go. Might be, I say, for it still isn't necessarily the best way, or needed, if the master pages are otherwise automatized throughout the Site Collection, as I will describe in this article.

For instructions on creating the basic custom UI solution, see Creating a Custom UI Solution for SharePoint.

With the masterpages done and other elements in order as well, it is time to deploy the solution. The solution contains a feature, and the activation of this feature will add the MasterPages and possible PageLayouts in the MasterPage Gallery of the SiteCollection, but unless we have a feature receiver to go with the feature, the rest is manual work.

To better understand the different MasterPages and their behavior on different types of sites, see About SharePoint 2010 MasterPages.

The first step for MasterPage automatization is to create a feature receiver that sets the MasterPages for the sites when feature is activated. Note, that if the feature is scoped as Web, it needs to be activated on each site separately. If it is scoped as Site, it is activated only once for the Site Collection and sets only the MasterPages of existing sites.

Add a feature receiver to the feature by right-clicking the feature > Add Event Receiver. Uncomment the FeatureActivated and FeatureDeactivated methods. For the FeatureActivated, insert the following code:


Note, that the MasterUrl sets the System Master and the CustomMasterUrl sets the Site Master. Foundation sites do not use the CustomMasterUrl at all, but it doesn't matter that it is set on those sites too.

For the deactivation method, copy-paste the same code, but change the MasterPages to e.g. v4.master and nightandday.master.

If we want to take this one step further, we can do some site identifying and set different MasterPages for different sites by their ID. E.g. the search site needs its own MasterPage, so we could add some code to the feature receiver so that it sets the search sites to use the custom search master, or if there is none, to keep using the default minimal.master:


You can check other site IDs e.g. in this article: Know the site template used for the SharePoint site.

Update your deactivation method likewise.

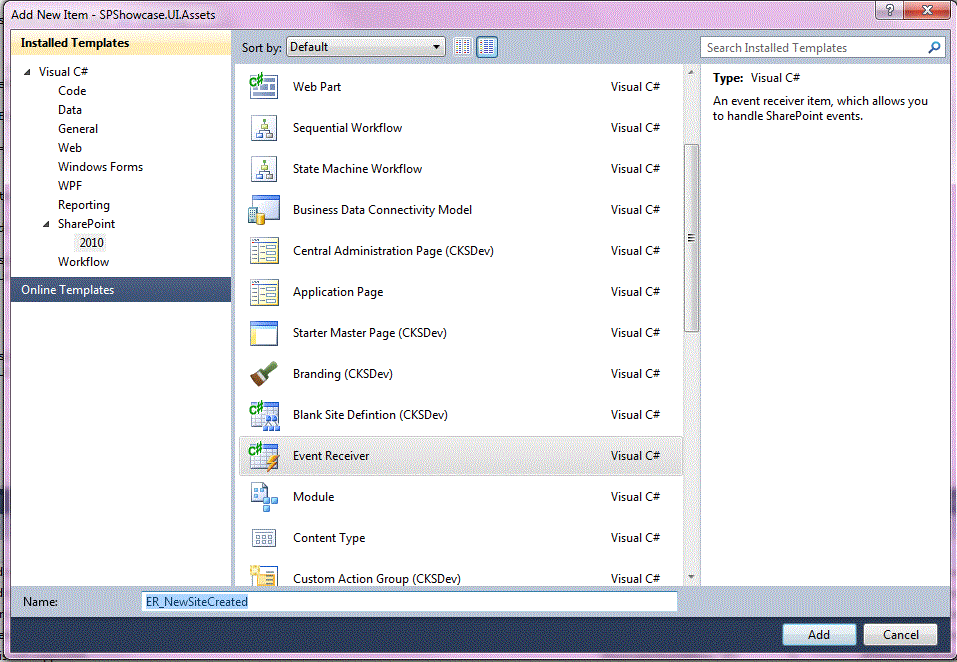
The feature receiver takes us as far as taking care of the existing sites. Next, let's take care of the new ones. Add an Event Receiver in your project:


Select Web Events, A site was provisioned:


Replace the default content of the method by the following code:


If you didn't use any ID-specific MasterPage settings in the feature receiver, you can disregard the if-else here too.

Creating a Custom UI Solution for SharePoint

To create a custom UI solution for SharePoint 2010, create a new project in VisualStudio2010, using the project template Empty SharePoint Project. Remebmer to set the Framework to 3.5!


Next steps are to the SharePoint SiteCollection you are using for testing, and to choose between Farm or Sandbox solution. I usually use the Farm Solution unless Sandboxing is required, because I prefer the Layouts folder for the stylesheets and images over the Style Library of an individual SiteCollection. Sandbox solution does not have access to the Layouts folder.

After the project has been created, add the mapping of the Layouts folder if you are creating a Farm solution:


or add a new module with the name StyleLibrary if you are creating a Sandbox solution:


Mapping the Layouts folder automatically creates a folder for your custom stylesheets etc. Inside this folder, create another one, Images.


The StyleLibrary module needs the same, so create a folder for your custom stylesheets, and one for the Images too. Also, delete the Sample.txt file from the module, it is not needed. 

Add a stylesheet to the UI.Assets folder, New Item > Style Sheet from the Web category:


If you are using the StyleLibrary, you need to check your Elements.xml now. The Module-node should look something like this:

Module Name="StyleLibrary" Url="style library"
File Path="StyleLibrary\Showcase.UI.Assets\SandboxSC.core.css" Url="StyleLibrary/Showcase.UI.Assets/SandboxSC.core.css"

When you add images in the Images folder, check your Elements.xml file if using the StyleLibrary. There should be a new File-element for each image, e.g.

File Path="StyleLibrary\Showcase.UI.Assets\Images\Logo.gif" Url="StyleLibrary/Showcase.UI.Assets/Images/Logo.gif"

Next let's add the MasterPages module. If you have installed the CKSDev tools, you can add a new CKSDev MasterPage (in this case, see more about using the CKSDev Starter Master Page), or add a new empty Module and name it MasterPages, in a similar way as the StyleLibrary module was added. Again, delete the Sample.txt file.

Add a starter MasterPage file to the module. You can use any OOB SharePoint MasterPage as a starting point (download a copy from the MasterPages Gallery), but I highly recommend to start with the a starter MasterPage from the Starter MasterPages by Randy Drisgill. There are starter files for publishing sites and foundation sites, pick the correct one for the correct purpose. 

To better understand the usage and inheritance of SharePoint 2010 MasterPages, see About SharePoint 2010 MasterPages.

After adding the first MasterPage, rename it if needed and then edit the Elements.xml file:


First thing to do with the newly added MasterPage is to create (or change) the custom CSS reference. In the starter MasterPages, this is ready for you:


When using the StyleLibrary, the reference would be like this:


Last thing before initial testing of the solution is to prepare our feature. Two things: rename it and set the scope. First rename the feature in the solution explorer, then double-click it to set the title and the scope:
  • Web, if the feature should be activated separately on each site - good for cases where not all sites need the same UI assets, or you want to activate the UI by using feature stapling with custom site templates
  • Site, if the feature should be used for the whole SiteCollection - only one activation required, for efficient use, create also a feature receiver and an event receiver for when sites are created

The base for the branding solution has now been laid.and the solution is ready to be tested. Right-click on the project name in the solution explorer and click Deploy. This both deploys the solution and activates the feature. When deploy is done, go to your site and set the MasterPage for the site - and start working with it! 

Since I do not use SharePoint Designer for any UI customizing, I need to deploy, re-deploy and so forth, the solution as I make changes. My method is to deploy the initial solution, as it is, and then start working with the sites in Firefox, using Firebug to try out the css when necessary before writing it in the css file. And of course the MasterPage needs a whole lot of html! The easiest way to apply changes to the SharePoint site after the initial deploy, is to use the Quick Deploy tool of the CKSDev tools.

When it is time to add PageLayouts, add a new module like with MasterPages. Download a copy of the most suitable OOB PageLayout from the MasterPages Gallery, and add the file to the module. Edit the Elements.xml; for one PageLayout should look something like this:


For information on creating a feature receiver and event receiver for a UI solution, see Setting MasterPages to Sites Automatically.

Quirks of the CKSDev Tools when Working with MasterPages

The CKSDev tools are a splendid toolset for SharePoint 2010 development. As I mostly create branding solutions, I use the Quick Deploy (Copy to SharePoint root) command for a quick and easy deploy without the tiresome iisresets and resulting reload delays etc. that come with the real deploy.


Most of the time this works perfectly, but in some cases I have noticed that it for some reason cannot update the MasterPage and PageLaouts files, but still works for the stylesheets and images. 

The other tool that comes in handy for me, mostly, is the Starter Master Page module. Mostly, I say, for this has a couple of issues. First, though, the reasons I still often prefer to use it for MasterPages rather than an empty module are
  • the included starter.master (by Randy Drisgill)
  • the better form of the Elements.xml, that is, it contains all the necessary properties for MasterPages ready made
  • most of the time the cranky VisualStudio html intellisense for MasterPages works with a bigger probability than when adding MasterPages in an empty module
The quircks are related to this feature not being a proper SharePoint module, but was designed for one MasterPage only and thus
  • you either need to create a new StarterMasterPage "module" with its own Elements.xml file for each new MasterPage
  • or you need to do a bit of manual work
The manual work required:
  1. the name you give the MasterPage when creating it as a new item, names both the "module" and the MasterPage file. E.g. if you name it MasterPages, then rename the MasterPage file and then you need to change the name of the file in the Elements.xml
  2. if you add new MasterPage files to the "module", you need to add it to the Elements.xml file yourself (this is easily done by copy-pasting) and set the Deployment Type property for it as ElementFile

About SharePoint 2010 MasterPages

I seem to have dropped bits and pieces of information, here and there, on the MasterPages in SharePoint 2010 and where and how they are and ought to be used when creating a custom UI solution. Time for a summary, here's a few words about the MasterPage usage and inheritance.
  1. There are two different MasterPage settings: the site MasterPage and the system MasterPage
    • Site MasterPage is used by publishing sites
    • System MasterPage is used by foundation sites and e.g. list views also on publishing sites
  2. The two above can be the same, or they can be different, e.g. if the publishing sites have no or a custom left navigation (or the publishing site version of the left navigation), the list views and foundation sites need a master with the quicklaunch navigation
  3. If there is a special MasterPage for the TopLevelSite (e.g. intranet front page), which often is the case (when it is not sufficient to simply hide elements from a special front page PageLayout), set this one first, and then you will need to set the MasterPage separately for each second level site because of the inheritance behavior described below
  4. While all other sites are fine with these one or two masters, the search site needs its own, for by default it uses the minimal.master, so we need to have a custom MasterPage derived from the minimal.master in order to show all elements on the page as should be
  5. About the inheritance:
    • Publishing sites automatically inherit the MasterPage from its parent site
    • When the Publishing feature is turned on for a foundation site, it too inherits the (system) master of its parent site
  6. When activating the custom UI feature with a MasterPage-setting feature receiver, the MasterPages will be set for all existing foundation sites, but not the ones created after this
  7. The MasterPages are referenced in a feature receiver or event receiver as
    • Site Master : CustomMasterUrl
    • System Master: MasterUrl
As to how to create a custom UI solution, see Creating a Custom UI Solution for SharePoint
and for instructions on creating a feature receiver and event receiver for masterpages, see Setting MasterPages to Sites Automatically.

Sep 23, 2011

Tip: Easy Way to Make Relative Links in Masterpage

Ever been frustrated because of how difficult if not impossible it is to fix in masterpages relative links within a Site Collection that actually work throughout the Site Collection? The solution is really quite simple (though not real pretty inside the html): use asp:Literal for href value.

For example:

Or use the SharePoint Link Button, which is a bit prettier, eg.

Sep 17, 2010

“You must specify a value for this required field” error on branded site

Afer branding this SharePoint 2010 site for a customer they encountered this weird error while saving edited pages: “You must specify a value for this required field” with no indication as to what field this refers to. No workflow was attached to the page library and furthermore, this applied specifically team sites, not publishing sites.

I first tarcked this down to the Comments-field of - what? The SitePages library versioning. So I had two workatrounds to offer the customer: disable page versioning or always check out/in pages, which asks for the comment, thus actually asking for the required value.

This however was just a workaround, not satisfactory enough, so some real solution was called for. Googling, once again I managed to acquire a solution that was so simple in itself, yet so farfetched that I was real sceptic about it. But it worked!

In a nutshell, the reason for this error was the hiding of the PlaceHolderPageTitleInTitleArea. I had moved this place holder in my master page to the hidden panel, with opening tag:
asp:panel  visible="false" runat="server"
This for some reason resulted in the error, but when changing the visibility setting to be done by a CSS rule, the error disappeared. Simply, add this CSS class, eg.
.hiddenpanel{
display: none;
}
Then replace the visible="false" attribute in the asp:panel tag by cssclass="hiddenpanel" attribute. And that's it.

Jun 16, 2010

Automatize MasterPages in SiteDefinitions

When building a branded SharePoint2010 solution, the customization of Master Pages is the issue. And as I've stated in a former blog post, one Master Page is seldom enough. In the least, the Search Center needs one of it's own. And maybe we need a customized Team Site? Or two? And one for BI reports? Etc.

Basically, when creating a branding solution - or any solution - you will want to use a feature. And preferably package it all into a wsp package, neat to deploy. It used to be complicated with a lot of handi-work when creating these in VisualStudio, but not anymore. VisualStudio2010 contains SharePoint 2010 project templates natively, adds many of the needed xml files, fills in features by demand, creates the wsp package... and makes SharePoint development extremely flexible by deploying the solution to your development environment with one click, activating your features on the go!

Thus, though, it is easy for a developer to forget a couple essential things for when the time comes to deploy the solution to the test environment of the customer.

1) It's rather convenient to set your features to activate whenever a site of the type is created. This is done by adding a sigle (or two, with the commentation of the code) line in the onet.xml file of the site definition:

inside the web or site (depending on the scope of your feature) features collection of your site definition configuration(s).

2) Create a feature receiver. The automatic activation of a feature is next to nothing it nothing happens. A feature receiver defines what happens when the feature is activated, eg. the MasterPages to use and where. In the simplest scenario, it defines one master page for the whole web. But it's not a big deal to make it acknowledge the different site definitions you've created. This way you can package them all in one feature instead of a minion.

In my example here, there is custom team site and a custom search center site defined with their own master pages plus the overall portal master page used everywhere else (for accuracy, I used the custom WebTemplateId's of my SiteDefinitions instead of WebTemplate names - possible also, but didn't work for me)


The code exerpt above is only the first half, you need to define likewise what to do when the feature gets deactivated.

[Edit. Jan 18th, 2012
For MasterPage automatization withour custom SiteTemplates, see Setting MasterPages to Sites Automatically.]

May 18, 2010

Full bread crumb trail for SharePoint 2010?

SharePoint 2010 doesn't include the same kind of bread crumb trail in it's master page as MOSS2007 did. However, the default.master in 2010 does include it so if you or your customer should want to have a full bread crumb trail on your siter, you can always dig the SDK for it or copy the original from the default.master - which I found easier and faster:
asp:sitemappath id="ContentMap" nodestyle-cssclass="ms-sitemapdirectional" runat="server" sitemapprovider="SPContentMapProvider" skiplinktext="" -- /asp:sitemappath

[edit: May 19. 2011
At some point this year one of my customers wanted to have the same breadcrumb displayed on every site in their environment, independent of the type of the site. This caused a problem: the publishing version wasn't sufficient, but the classic version shows too much (displays the Pages library in the breadcrumb). So I found the solution in a custom breadcrumb, made by the guys at Sininen Meteoriitti:
http://www.sharepointblues.com/2010/02/08/a-single-breadcrumb-for-all-sharepoint-pages/

edit: April 16. 2012
After using the custom breadcrumb by Sininen Meteoriitti for a while, I discovered that I actually don't need any custom classes, custom code, to achieve what I needed. It took me this long to write about it, but now it is in my blog: A Consistent Breadcrumb Trail Experience]

Enable browser scrolling in SharePoint2010

In SharePoint 2010 v4 type master pages, the ribbon is initially set so that it doesn't scroll along with the page. This is done by a css rule for div id "s4-workspace" and by setting the overflow-rule of body tag as hidden.  Also, for this same reason there is this scroll="no" attribute set for body tag. These settings, however, may result in totally missing scrollbars in wider set-width layouts so you may want to change these settings and have the browser scroll bars back in use. 

1) Remove the scroll="no" setting  in body tag
2) Override the overflow-rule of body-tag in your own css stylesheet (you need to set it !important) or change it in the head section of the master page, where it is initially set
3) Either remove the s4-workspace div or id, or override it's overflow-rule as well

This should do the trick!

Branding Master Pages in SharePoint 2010

There are two types of master pages in SharePoint 2010: those named with v4 that are purely 2010 compatible, and those without the v4 (ie. minimal master and default master) that are compatible with 2007, that is to be used when sites are migrated in 2007 compatibility mode. V4 master pages natively include the ribbon. 

As for creating your own branded master pages, I highly recommend to use the starter master pages modified by Randy Drisgill: http://startermasterpages.codeplex.com/releases/view/41533, rather than try to fix your own ones. Note, that just like in 2007, there are several different types of master pages in 2010 too, according to the type of site you are creating.

However, these starter master pages aren't sufficient if you are going to enable search in your site collection. Search sites natively use the minimal.master included in 2010 itself, and thus "break" with any v4 master page for the layout and used content parts differ. The search results page won't bring an error, though, but no content can be seen on the page. Therefore it is essential to create another branded master page using the native minimal.master. And probably you will want to create a site template for search sites, using the right master page for your search center.

Jan 14, 2009

Implementing Master Pages and Page Layouts

When branding a SharePoint site, the two main elements to modify are the master page - oh, you can always have several but I if you can do with only one, go for it - and the page layouts. Modifying or designing and building them from a scratch is one story, which I will probably be visiting some other time in some other post in more detail, and the implementing of these is another one, and the main topic of this post.

Independent of whether you modify the original master pages and page layouts or build your own, you have basically two options in implementing them on the SharePoint site collection. And the third one, when building a whole solution for a customer, e.g.

1)
Your first option is to open your SharePoint site collection in SharePoint Designer and navigate to the _catalogs\masterpage folder that contains all the original master pages and page layouts. As it is, you can now duplicate any of these by a simple copy-paste of the whole file and then modify your copies, or create whole new pages from the scratch and save them in the folder (just remember that SharePoint is very sensitive by way of adequate references etc. in the pages!). All the attached files like pictures and stylesheets can be stored in the site collection Style Library, which you can also access in SharePoint Designer.


Which ever way you create the pages, they are ready to use as soon as you check them in, publish and approve them (right-click on the file name in the folder list and SharePoint Designer takes you through the rest of it). After this, you can switch to the browser and, as for the master page, apply it to you site collection in the site settings of the site collection, choosing Master Page in the Look and Feel category. Remember to set the inheritance right - but don't be surprised when the new team sites don't use the set master page, for they don't.


As for page layouts, they're ready to be used when creating a new publishing page on any given publishing site in your site collection. This ok, but not very easily recreated in case of need to duplicate or reconstruct the site collection.

2)
You can do this same thing also as a feature. You can even make most of the modifications in SharePoint Designer if you wish. But the building doesn't start in SharePoint Designer, it starts in SharePoint HIVE (that is Program Files\Common Files\Microsoft Shared\web server extensions\12). In HIVE, there is a folder that contains all the example master pages and page layouts that can also be found in the master page gallery of the site collection. This folder is HIVE\TEMPLATE\FEATURES\Publishing Layouts. In order to create your own feature of master pages, page layouts and related files, duplicate this folder (copy-paste).

Rename your copied folder and then navigate into it. The two xml files in the root of the folder, feature.xml and provisionedfiles.xml are files you definately need so don't delete them. But what comes to all the other files, inside the subfolders, you can either delete them, or use them or some of them to make your own master page and page layouts. In theory, you can do the modifications in SharePoint Designer, but I highly recommend opening the files in Visual Studio instead. If you need to test drive the pages, set up a test site collection and in it, do as explained in scenario 1) but copy the code between Visual Studio and SharePoint Designer instead of copying the whole files.

Save all the other files like pictures and stylesheets in the folders of your own feature.

The installing of a feature needs to be done as an stsadm-command, and after that, the feature needs to be activated in your site collection. After doing this, you will find the master page in the master page gallery, same as above, in scenario 1.

Since Heather Solomon has done such a fabulous job on describing the steps of creating your own feature, I will not go into it in my entry, but rather recommend on reading hers for more detailed description:
http://heathersolomon.com/blog/articles/servermstpageforsitecollect_feature.aspx

3)
The third sceanrio is one of building a site collection from a scratch, with the help of a solution, or, simply implementing the feature as a complete solution. This requires VisualStudio plus the additional tools and e.g. wspbuilder, in order to create a site definition or other sort of SharePoint solution. When building a customer solution, this is the most convenient scenario of these three options. I will be back to this topic sometime later on.