Showing posts with label display templates. Show all posts

Sep 29, 2016

List with Paging on the Bottom Control Template

One of our customers wanted to use the List with Paging control display template on their news page. For some strange reason this template positions the paging in the top right corner of the web part instead of at the bottom of the list, and preferably horizontally in the center.

I fugured there were two options to do this:
1) Use CSS only (usually my preferred way)
2) Create your own display template for the purpose

Now the problem with approach #1 is that there are other content search web parts on the page too, so if you make general rules to create space at the bottom of the ul.cbs-List, this will be applied to all of those CSWPs. There is no special CSS class to hook into in the paging template ul. So even at best, this approach is a bit of a hack because in order to target it properly, you would need to use some container identifier and thus cause the whole hack to break if the web part is moved to a different zone on the page.

Number 2 seems easy enough, though, and replicable, which is even better. I set to action, downloading the original Control_ListWithPaging.html template file and opening it for editing in Expression Web and saving it with a new name. 

First, I added another class to the ul.cbs-List element, in order to be able to target rules only to the CSWPs using my new template. Small enough change, don't you think? 

<ul class="cbs-List pagingbtm">

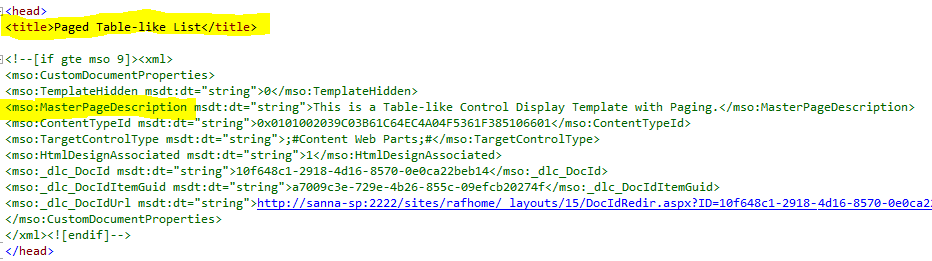
Of course I also changed the title of the html document to List with Paging on the Bottom.

<title>List with Paging on the Bottom</title>

No biggie, right? I then uploaded the file, just to check that it works. Which it didn't! This puzzled me immensely, especially since the error message said, that the div, body and html tags have not been closed. They are not closed in the original control template (at least not when I opened it in notepad to check) but that works fine. 

So fine, I closed those tags at the end of my new template file. The error message disappeared and instead my template worked perfectly. Well, almost. The little arrow icons weren't visible but at least there was no error anymore. I decided to ignore that for the time being and finalize my control template changes. 

As said, I could've done it all in CSS only (after adding the new class), but I decided to make one more minor change in html to make the css shorter and less vulnerable and avoid the extra space when there are less items than the paging limit. I moved the resultset to the beginning of the list, so that the paging became the last node instead of the first one.

The results are displayed by this variable:
_#= ctx.RenderGroups(ctx) =#_

It is originally right before the closing ul tag. By simply moving it right after the opening ul tag, the order is reversed.
<ul class="cbs-List pagingbtm>
_#= ctx.RenderGroups(ctx) =#_

When this was done and tested, I started looking into that arrow icon issue. Quirkily, the img src was pointing to a nonexistent file on my own computer! This can be blamed on Expression Web. It's a first, though! I'm quite used to SharePoint Designer pulling off sh*t like this, but Expression Web has generally been a very reliable editor and loyal to the original code. Not this time. 

I opened the original file in notepad and sure enough, the correct source string was there, intact. 

<img class="_#= $htmlEncode(nextPageImageClassName) =#_" alt="_#= $htmlEncode(lastPage.title) =#_" src="_#= $urlHtmlEncode(GetThemedImageUrl('spcommon.png')) =#_">

So I copied and pasted it to my template and all was well in SharePoint Land again.

Here's the CSS:
ul.cbs-List.pagingbtm li.ms-promlink-header {
    text-align: center;
}
ul.cbs-List.pagingbtm .ms-promlink-headerNav {
    float: none;
    margin-top: 6px;
}

May 18, 2016

Search Results vs. Content Search Web Parts: customizing and date formatting

The default way to display feeds from news, events etc. on an intranet front page is to use the Content Search Web Part. Used to be Content Query, but customizing the CQWP is way more complicated plus it is restricted to the same Site Collection only. This is still used, as is, by many of my customers, for it is easier for content managers to set up than the search queries. Anytime any custom templates are needed (or when I am setting up the feeds), definitely CSWP is the way to go.

Lately, though, I have had several customers with SharePoint Standard lisence only. Unfortunately this leaves out the CSWP completely. Search indexing and search driven content is still available, but building those said feeds is just a tad more complicated for you need to use the Search Results Web Part, which is not created for this kind of usage, even though it CAN be used. It requires some more work, but once you've figured out the basics, it's not that difficult. Just a bit different than the CSWP.

The display templates of CSWP consist of a control template and an item template (for more info, see my post "The Anatomy of SharePoint 2013 Display Templates"). Mostly the modifications and customizations are rather straightforward to make by following the example of things already there. The date formatting, however, is a bit tricky. What you need to do is:

1) Copy the item display template you want to modify from MasterPages gallery, Display Templates, Content Web Parts directory.

2) Create a managed property of the field you want to use, if not using Created or LastModifiedDate, in Search Schema.

3) Use the date field as value for desired line data, eg:

var line1 = $getItemValue(ctx, "Line 1");
var line2 = $getItemValue(ctx, "Line 2");
var eventdate = new Date(line2.inputValue);

4) Format the date as you wish in the HTML where the value is rendered:

 <div class="cbs-Line2 ms-noWrap" title="_#= $htmlEncode(line2.defaultValueRenderer(line2)) =#_" id="_#= line2Id =#_">_#= eventdate.format("d.MM.yyyy H:mm") =#_</div>

5) Upload your display template (remember to change the title in the HTML and rename your modified file) back to the same folder in MasterPages gallery and publish it. It's ready to be used.


As for the Search Results web part, the system is slightly more tricky. First off, there are more display templates involved: 
  • Control templates
  • Item templates
  • Item HoverPanel templates
Mostly, you need to work with Item templates and/or hoverpanel templates, if using the hover panel. In the case of displaying feeds on front page, the hover panel is seldom wanted. It can be removed. Simply delete highlighted parts from the display template you copied, eg. ItemDefault (note, that the Search Result templates are in the Search folder):

<div id="_#= $htmlEncode(itemId) =#_" name="Item" data-displaytemplate="DefaultItem" class="ms-srch-item" onmouseover="_#= ctx.currentItem_ShowHoverPanelCallback =#_" onmouseout="_#= ctx.currentItem_HideHoverPanelCallback =#_">

And then comment out the following line:

 <!--  <div id="_#= $htmlEncode(hoverId) =#_" class="ms-srch-hover-outerContainer"></div> -->

Other modifications that I have found useful and quite necessary in said use case are
  • removing the item URL - actually in default item template I just remove the whole default body render tag:
    _#=ctx.RenderBody(ctx)=#_
  • building your own stuff to show for each item, e.g. rollup image, a content summary, publish/create date eg. 
Adding fields to the display template is simple enough. The fields need to be managed properties in Search Schema, so remember to do this first for any custom fields. Then you add the properties to the template mso:ManagedPropertyMapping tag:

<mso:ManagedPropertyMapping msdt:dt="string">'Title':'Title','Path':'Path','Description':'Description','EditorOWSUSER':'EditorOWSUSER','LastModifiedTime':'LastModifiedTime','CollapsingStatus':'CollapsingStatus','DocId':'DocId','HitHighlightedSummary':'HitHighlightedSummary','HitHighlightedProperties':'HitHighlightedProperties','FileExtension':'FileExtension','ViewsLifeTime':'ViewsLifeTime','ParentLink':'ParentLink','FileType':'FileType','IsContainer':'IsContainer','SecondaryFileExtension':'SecondaryFileExtension','DisplayAuthor':'DisplayAuthor','Created':'Created','NewsSummary':'NewsSummary', 'PublishingImage':'PublishingImage' </mso:ManagedPropertyMapping>

Then you use this to build your own HTML for the items, eg.

<div id="_#= $htmlEncode(itemId) =#_" name="Item" data-displaytemplate="DefaultItem" class="ms-srch-item">
    <div class="newscontainer">
<div class="newstitle">
<a href="_#=ctx.CurrentItem.Path=#_">
_#=ctx.CurrentItem.Title=#_
</a><br>
               <span class=newsdate>
              _#=ctx.CurrentItem.Created=#_
</div>
<div class="newsbody">
<div class="newsimg">
_#=ctx.CurrentItem.PublishingImage=#_
</div>
<div class="newstext">
_#=ctx.CurrentItem.NewsSummary=#_
</div>
</div>
</div>

Note the date there, though. It will give you a very long date format by default, but in a Search Results template it is way easier to format the date than CSWP. Simply add format(yourdiesiredformatting) to the value in HTML. Like this:

_#=ctx.CurrentItem.Created.format("d.M.yyyy")=#_


Then there is only one little nuisance left: the hover background color. 


This comes from this CSS rule: 

.ms-srch-item:hover, .ms-scrch-resultHover:hover, .edisc-SearchResultItemContainer:hover{
background-color: rgba(...);
}

Now, if you override this as is, it will effect the search results pages too. So try to identify the targets in some way, use eg. .welcome or .article classes for targeting content pages only in removing the hover color.

Whew! All done!

Oct 6, 2015

Scoped search results predefined empty

Many are the things you think should be simple in SharePoint, and yet they're not. Another day, another little issue to solve. 

We have made this JavaScript listing of subsites inside a site collection. A site directory. For certain reasons the Content Search Web Part nor the Table of Contents was the thing. That aside, I'm not going into that more deeply here, the other thing that was needed there, was the ability to search the directory.

One would imagine, that it would be simple enough to add a search box to the page, and a search results web part, and then configure it to show only results for search box queries, and show nothing unless a query is made.

Not so much. Not a big deal either, but requires a couple of tricks.

First of all, you need to set the query for the results web part. In this case, there are three things to set up: 
  1. The results need to be restricted to this site (or site collection, depending on where you're setting this up) only
  2. The results need to be site item type only
  3. The results need to be restricted instead of filtered by the search box query (as would be the default, the results web part showing a listing of all sites unless a query is made)
With all this noted, the query would look like this:
{?{searchTerms} path:"https://YourSiteOrSiteCollectionPath"  contentclass:STS_Web}

This can be either typed in, or if you need to modify the result types etc. use whatever query settings are provided. Just be sure to wrap the whole thing inside the {parentheses} with the
?{searchTerms}at the very beginning of the clause.

In the web part properties you might want to tick off some of the settings like eg. choose to not show the adanced search link, preferences link, language dropdown etc. The setting you won't find there, even though the search results display template actually hints that it should be there, is to select "Show nothing when there are no results". The Content Search Web Part does have this setting, so I was kinda surprised.

This just means, that when no query has been made or it does not provide results, you will see all these suggestions and tips in the web part:


In order to be rid of those (or at least the suggestions), depending on what you want - in this case, the web part needed to be completely empty unless there were some search results to show - you need to modify the display template for the search results. I.e. download a copy of the default one, make the necessary changes and upload your modified one to the gallery. 

All the display templates of a site collection are located in the Master Pages gallery, Display templates folder. Search results display template is in the Search folder. Download a copy of the original html file.


Open the downloaded file in an editor (I prefer Notepad...) and search for the div with the id of NoResult.

<div id="NoResult">

Inside that div you can see a bunch of JavaScript and html. If you only wish to get rid of the suggestions, delete only the <ul> element from the page, or replace it with something of your own. 


As it went, I wanted nothing to be shown unless there were some results, so I emptied the NoResult div completely. 

Change the title of your template (third row of the template) and save it locally with a new name. Upload your modified template to the same Search directory of the Display templates as the original one. Don't worry about any .js files; SharePoint will generate it upon upload. 

You most probably will need to publish your template before it can be used in the web part. When this is done, navigate back to the page with the search results web part you are setting up and open the we part properties. (Note, the page needs to be saved and reopened for editing before it can find the new display template)

In the Display Templates settings select your modified template.


Save web part properties, save (and publish) page and the search is ready.


Jun 25, 2015

Open documents in Office Web Apps from CSWP

One of my customers has a Content Search Web Part in their intranet home page, listing both documents and pages. They have Office Web Apps installed and are quite happy with the way documents open to OWA instead of the desktop client from the document library and search results. The CSWP, however, does not natively support opening documents in the OWA, so a bit of display template modification is required.

I was already using rather heavily modified item display template for the customer, so I simply needed to modify that one, but you can also copy any item display template (from the Master Pages gallery, Display Templates > Content Web Parts folder) that best fits your purposes and modify the copy. Mind you, you only copy the html template, modify it, save it with another name and upload it back to the library. The .js file will be automatically created.

The things you need to do to your display template in order to enable opening documents in OWA are: 

1) Add the managed property 'ServerRedirectedURL' to the managed properties: 


This is the property that provides the open in OWA url for documents. You could use this as a simple property for the LinkURL, but if you cannot be certain that each and every document that gets listed in the CSWP is in fact an office document, you need to add a bit more code to the template.

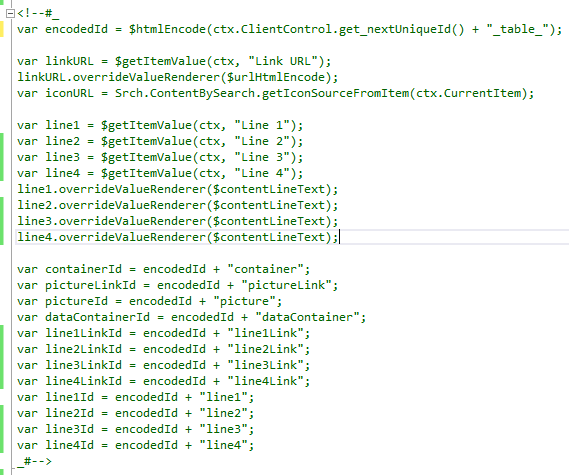
2) Right there, where the commented code of the display template begins, below the var encodedId line, insert the following code I intecepted from the common search result item template:

var useWACUrl = !$isEmptyString(ctx.CurrentItem.ServerRedirectedURL);
        if(ctx.ScriptApplicationManager && ctx.ScriptApplicationManager.states){
            useWACUrl = (useWACUrl && !ctx.ScriptApplicationManager.states.openDocumentsInClient);
        }
        var appAttribs = "";
        if(!useWACUrl)
        {
            if (!$isEmptyString(ctx.CurrentItem.csr_OpenApp)) { appAttribs += "openApp=\"" + $htmlEncode(ctx.CurrentItem.csr_OpenApp) + "\"" }; 
            if (!$isEmptyString(ctx.CurrentItem.csr_OpenControl)) { appAttribs += " openControl=\"" + $htmlEncode(ctx.CurrentItem.csr_OpenControl) + "\"" };
   
        }
        var url = ctx.CurrentItem.csr_Path;
          if($isEmptyString(url)){
            if(useWACUrl)
            {
                url = ctx.CurrentItem.ServerRedirectedURL;
    
            } else {
                url = ctx.CurrentItem.Path;
   
            }        
        }

3) Then modify the LinkURL variable to use the url instead of the default Path:
var linkURL = $urlHtmlEncode(url);

4) Finally, remove the line
linkURL.overrideValueRenderer($urlHtmlEncodeValueObject);

And that's it, folks.

Mar 26, 2013

How to Deploy Display Templates via SharePoint feature

[As to the question(s) "What are Display Templates, what have they eaten and how do I create my own?", see answer in the post The Anatomy of SharePoint 2013 Display Templates.]

Instead of adding my own Display Templates to a customer environment through Design Manager, I'd rather use a bit more controlled and less manual way of doing it, namely the same way as a I prefer when provisioning any branding files: Feature. A custom solution with a feature. As for how to create the branding solution base, please see Notes on Creating a SharePoint 2013 Branding Solution. This post will focus on the special issues of provisioning Display Templates.

While you still can create and provision MasterPages as .master files and PageLayouts as .aspx files, the Display Templates have been built for SharePoint 2013 solely using this HTML file -> conversion to *smtg* (in this case, .js file) technology. So even when using VisualStudio 2012 and features and such, we are working with HTML files that will be automatically converted once deployed to the _catalogs/masterpage Gallery.

Keeping that in mind, issue #1: adding the files to the solution

To add Display Template HTML files into your solution
  1. add a new module to your solution
  2. download a copy/copies of existing Display Template HTML files from the _catalogs/masterpage/Display Templated/Content Web Parts or Search directory, depending on which ones you need to create
  3. add the copies to the module and rename them
Issue #2: Display Template Properties

The properties for Display Templates are mostly set in the <head> section of the actual HTML file:


so don't define e.g. Title, ContentType, MasterPageDescription... in the Elements.xml. What you should add to the file in Elements.xml are the attributes Level and ReplaceContent. Level should be set to "Draft" in order to enable the .js conversion (it won't happen if the HTML file is published). ReplaceContent should be set to "TRUE" in order to enable the re-conversion when the file is modified and reprovisioned. And the usual Type="GhostableInLibrary" is needed too.

So this is how the basic Elements.xml would look for one Display Template only:
<Module Name="DisplayTemplates" Url="_catalogs/masterpage/Display Templates/Content Web Parts" RootWebOnly="TRUE">

<File Path="DisplayTemplates\Item_MyTemplate.html" Url="Item_MyTemplate.html" Type="GhostableInLibrary" Level="Draft" ReplaceContent="TRUE"/>

</Module>

Issue #3: the .js file after the conversion?

I found quite many references in the interwebs stating that it would be good to provision the (converted) JavaScript file together with the HTML file. If you do this, add the property
<Property Name="ContentType" Value="Display Template Code" />
to the file. 

Issue #4: publishing the Display Templates on feature activation

On activation, the feature provisions the files, and Master Page Gallery receiver code performs the conversions, but the files are still drafts.For guaranteed usability, the HTML files should be published. This can be done manually, but it can also be dealt with in a feature event receiver. The basis for this is that the HTML file be stamped to the feature by issueing it the Feature ID as a property in Elements.xml:

<File Path="DisplayTemplates\Item_MyTemplate.html" Url="Item_MyTemplate.html" Type="GhostableInLibrary" Level="Draft" ReplaceContent="TRUE">
<Property Name="FeatureId" Value="$SharePoint.Feature.Id$" Type="string"/>
</File>

Then, in the feature event receiver this can be used as an identifier by which to select the files to publish. My event receiver code is based on code provided by Waldek Mastykarz in his article Automatically publishing files provisioned with Sandboxed Solutions and looks like this:

 private string[] folderUrls = { "_catalogs/masterpage/Display Templates/Content Web Parts" };

        public override void FeatureActivated(SPFeatureReceiverProperties properties)
        {
            SPSite site = properties.Feature.Parent as SPSite;
            if (site != null)
            {
                SPWeb rootWeb = site.RootWeb;

                SPList gallery = site.GetCatalog(SPListTemplateType.MasterPageCatalog);

                if (gallery != null)
                {
                    SPListItemCollection folders = gallery.Folders;
                    string featureId = properties.Feature.Definition.Id.ToString();

                    foreach (string folderUrl in folderUrls)
                    {
                        SPFolder folder = GetFolderByUrl(folders, folderUrl);
                        if (folder != null)
                        {
                            PublishFiles(folder, featureId);
                        }
                    }
                }
            }
        }
        private static SPFolder GetFolderByUrl(SPListItemCollection folders, string folderUrl)
        {
            if (folders == null)
            {
                throw new ArgumentNullException("folders");
            }

            if (String.IsNullOrEmpty(folderUrl))
            {
                throw new ArgumentNullException("folderUrl");
            }

            SPFolder folder = null;

            SPListItem item = (from SPListItem i
                               in folders
                               where i.Url.Equals(folderUrl, StringComparison.InvariantCultureIgnoreCase)
                               select i).FirstOrDefault();

            if (item != null)
            {
                folder = item.Folder;
            }

            return folder;
        }
        private static void PublishFiles(SPFolder folder, string featureId)
        {
            if (folder == null)
            {
                throw new ArgumentNullException("folder");
            }

            if (String.IsNullOrEmpty(featureId))
            {
                throw new ArgumentNullException("featureId");
            }

            SPFileCollection files = folder.Files;
            var drafts = from SPFile f
                                  in files
                                  where String.Equals(f.Properties["FeatureId"] as string, featureId, StringComparison.InvariantCultureIgnoreCase) &&
                                  f.Level == SPFileLevel.Draft
                                  select f;

            foreach (SPFile f in drafts)
            {
                f.Publish("");
                f.Update();
            }
        }

Issue #5: Ah, this should pretty much cover it - get to work!

The Anatomy of SharePoint 2013 Display Templates

Display Templates, used in Search Results, Content Search Web Part and other search driven Web Parts to establish the visualization of the displayed data, are a combination of an HTML file and a JavaScript file. In order to create your own Display Template, you only need to modify the HTML file and let SharePoint handle the .js conversion. You can add your own JavaScript logic by referring to your own separate .js file in the HTML file.

The starting point is to copy one of the existing Display Template HTML files. Naturally, you want to start with one that is as close to your destined form as possible, so you can either try the existing ones out or check out the MSDN Display Template Reference.

As you can see in the reference (if you opened it), there are two basic types of Display Templates (Item and Control templates), plus the Hover template for the search results. As for the Control and Item templates, they are a loose pair. The Control template controls the basic structure where the data items will be injected, e.g. forming a list structure where the <li> element will be the repetitive element, diplaying data according to the selected Item template.


The actual Display Template files contain a bundle of HTML and JavaScript and jQuery. 

First of all, the <head>

Both Control and Item Display Templates contain their basic information, like the Title and the Description in the head section of the HTML file. 


The Item template also introduces the managed propert mappings used to retrieve the item metadata in the head section.


You can add Property Mappings and modify them, you can set default fields for data value retrieval or leave them empty.

Your own script or CSS

If you want to reference your own script or CSS style file, you can do that using the $includeScript or $includeCSS functions inside the <script> element in the body section, e.g.:


Item Display Template Variables

In the Item Display Template, you need to set the variables, the mapped properties before you can use them in HTML. This is done in the code section inside the body:


Item Display Template HTML

Then, you can edit the HTML to your liking, e.g.


Control Template Script and HTML

Control Templates contain a whole lot of jQuery & JavaScript to e.g. provide paging, and simply to provide the results. I did not find a reason to meddle with that, for now, but that can be customized as well.

The HTML structure is a bit scattered in the midst of the code, but you can find the element tags such as the <ul> start tag and add your own custom HTML within, e.g.


to provide headers for the item info.

With a little bit of CSS...

...the template with some custom data could look like this:


As for the deployment of these files?

You have two options:

1) Use the Design Manager. Map the -catalogs/masterpage gallery as a network drive, or use SharePoint Designer 2013 to work with the files. Once you have modified your Display Templates, upload them (the HTML files) and the possible support CSS and own script files to the MasterPage Gallery (select correct folder by intended usage, basically the same one you copied the file from). Check in Design Manager that the .js creation went ok. 

2) Use VisualStudio2012. Create a SharePoint solution to deploy the files via a feature. Notes on this in How to Deploy Display Templates via SharePoint feature.