Showing posts with label SharePoint2007. Show all posts

Aug 23, 2011

Yes, You Can Revert to UI v.3 After Visual Upgrade

One of our customers had done the migration from MOSS 2007 to SharePoint 2010, but something went wrong with the Visual Upgrade. Until the problem is solved we decided to revert back to the UI version 3. But as it goes, when the upgrade has been done to the whole site collection, the options to revert aren't visible anymore. Instead, you need to use the SharePoint Management Shell.

For showing the options on a single site:
$SPWeb=Get-SPWeb YourSiteUrl
$SPWeb.UIversionConfigurationEnabled=$true;$SPWeb.update();

And in all sites in a Site Collection:
$SiteCollection=Get-SPsite YourSiteCollectionUrl
foreach($SPWeb in $SiteCollection.AllWebs){$SPWeb.UIversionConfigurationEnabled=$true;$SPWeb.update();}

You do not need to run either one of the above if you are going to simply revert the site/Site Collection to the previous UI, but if you want to show options again for testing purposes, those are the commands to use.

For the actual reverting to UI v.3, use this for the Site Collection (or modify command to use it for one site only, similar difference as shown above):
$SiteCollection=Get-SPsite YourSiteCollectionUrl
foreach($SPWeb in $SiteCollection.AllWebs){$SPWeb.UIversionConfigurationEnabled=$false; $SPWeb.UIVersion=3;$SPWeb.update();}

In the example above I hid the options again so that no one could mess with the UI versions again until problem was solved and version changed by administrators again.

For more reference on Visual Upgrade, see TechNet Library.

May 9, 2011

Invalid HTML in CEWP Causes Javascript Error on Page

One of my customers had a problem with the webpart menu on certain site pages in MOSS 2007 with a Content Editor Webpart on the page. The webpart menu on the content editor webpart and randomly, it seemed, on some other webparts on the page, wouldn't open at all and the page reported an error. Debugging this, the error I got was 'style.display' is null or not an object in the javascript file ie55up.js.

This error message, however, isn't really helpful for correcting the problem. There is nothing wrong with the javascript code, nor the webpart menu; the problem is the html in the content editor webpart contents. Apparently the editor of the page had copy-pasted the contents of the webpart from one to another and yet another, resulting in unwanted div-tags in the beginning of the webpart content, containing a false id attribute which seems to cause the javascript error.

So, to correct this error one should get the content editor webpart to editing mode, open the rich text editor and there swich to the html code view with the < > -button and delete these div-tags. Not an easy task though, when this very thing is causing an error opening the webpart menu! On one site, I managed to get the menu to work again by closing the webpart and then adding it to the page again from the closed webparts gallery. But on the other sites, trying to close the webpart only ended up in a SharePoint error page.

So what I did, was to open the page content list by adding ?contents=1 on the address bar after the page url and delete the whole webpart on that page. There it didn't cause an error. After that I could add a new content editor webpart on the page, without errors. And since I still wanted to restore the old contents, I had copy-pasted it form the page to notepad, from which I could then again copy-paste it to the new CEWP, clean.

Aug 26, 2009

Default Content Types - do not touch!

Content Types are a very powerful means of distributing eg. document templates through the whole Site Collection. And if used in a wrong though possible way, they may turn out to be overpowering even.

There was this issue of distributing the company word template to each and every document library in a site collection with already dozens of sites and libraries in it. A custom content type requires a lot of hand work before it is in use in each of the libraries. But since there is a default document content type, why not change the template it uses?

The default Document Content Type is in fact a sort of pseudo top class that doesn't really contain information about templates. The actual templates are defined in site and list definitions, in site definition and site collection onet.xml files. The blank default document templates referred to in the onet.xml file are in the SharePoint HIVE. Theoretically you could replace these files with you're own, but that's a no-no too.

If you happen to try out this in itself easy looking and appealing scenario of modifying the default document type, you will notice that it gives a log of warnings after making the change and it makes you believe that no change really took place, but it actually does seem to work when you go to a document library and click New to create a new deafult type document. The document uses the template that was set in the document type settings.

So what's all this fuss about then? The next time you create a new document library anywhere in the site collection, you will find that you have lost the possibility to change the default document type of the library. There is no more a drop-down with word, excel powerpoint, basic page etc. choice to make. The default document type template overrides this very functionality of the document libraries. It does not affect the use of custom content types, though.

Fortunately this doesn't create a catastrophe and is easy to change back - the same way the situation was first created. You only need to go to the Advanced settings of the Document Content Type and clear out the text box showing the template file information, and save the settings. It gives the same error log, but saves the day.

Thus the conclusions are:
1) do not modify default content types, stick to making your own ones
2) if you want a modified library with modified document content types, either make the modifications to one library and save it as template, or - even better - make your own list definition and/or site definition solution package

Aug 25, 2009

Embedded InfoPath Form on SharePoint Page

Looking to publish an InfoPath form on a SharePoint page, I encountered a couple disturbing problems:
1) the new form to fill needs to be launched from the library, which certainly isn't something I want on a public website
2) the form opens out of the website, as it's own webpage, out of the website navigation

After some googling I found one rather nice looking solution: use the Form View Web Part. Only thing is, that even though it's natively SharePoint, it's not declared on SharePoint sites for use. So before it can be used, it needs to be enabled, and that means eg. editing the web.config file - not a recommendable thing to do, really. (Yet, if this is what you want to do, instructions can be found eg. in Elczar's blog.)

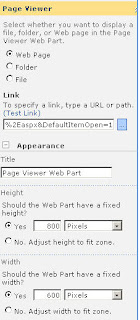
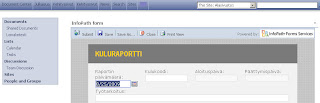
However, there are more simple means of showing an InfoPath form on a SharePoint page. You can simply use the Content Editor Web Part with an iFrame showing the new form as a web page, but even more simple is to use the Page Viewer Web Part and show the new form as web page in it. This works on any page with web part zones, but looks nicest when it is the only web part on the page, eg. on a one-column page layout page.

Add a Page Viewer Web Part on the page where you want to display the form. Then click to open the tool pane of the web part. In the toolpane, set the page link to open the new form. You can retreive this url by navigating (in another window/tab) to your form library, click "New" and copy the url of the form page that opens.


You might also want to change or hide the title and adjust the height and width of the web part for better user experience.


Now each time the page is loaded, a new form is shown on the page. Only thing still bothering me is the toolbar - closing the form takes the user to the form library and this really isn't something I want to happen! But unfortunately I haven't come up with anything to fix this just yet.

And another issue is the library itself - even though I want users to be able to fill in and submit forms, I don't want them to have access to forms saved/submitted by others. Thus, if the forms are saved to the forms library, there needs to be a workflow moving each form to some other library right away. That at least is fixable ;)

Ofcourse, there are some third party solutions for this as well, but I have no idea how they differ from the SharePoint native web part - except for their installation I believe. I assume they are deployed as features or solutions that don't require hand-made repairs to any original files.

Jun 10, 2009

Easy-to-change Title Logo

A pretty simple tip, actually, but also a bit on the quick-and-dirty side. I wouldn't be recommending this as the first choice or common prosedure in branding SharePoint. But this works neatly enough in a project where the goal is to make as few customizations as possible and keep the focus on using SharePoint as much out of the box as possible.

Lets say we have a corporation with a MOSS intranet. They make a custom MasterPage with minimal changes, maybe none at all. They make a custom CSS page with corporate brand colors and fonts. They want the corporate logo to be visible on any and every page. But they want to leave it open for companies within the corporation to change the logo into their own one.

You can always insert the logo in a custom made spot of the master page, probably controlled by the CSS file. But if the logo is pratically the only thing each company needs to change on their own sites, a flexible way to make it possible is to use the Title Graphic sharepoint control.

On the MasterPage, you will see, that the default logo is referred to with a pseudo-url "_layout/images/titlegraphic.gif". There is no such diectory for real, instaed this refers to a directory in the SharePoint "hive": C:\Program Files\Common Files\Microsoft Shared\web server extensions\12\TEMPLATE\IMAGES, in which the titlegraphic.gif can be found. Copy the company logo to this directory, rename the original titlegraphic.gif (e.g. titlegraphic_orig.gif), then rename your company logo as titlegraphic.gif.

Now each and every site on the server farm should have the company logo in the place of the former titlegraphic. This will not break the dynamicity of the control and each company can easily substitute this logo with their own simply in Site Settings.

Note, that since the replacement was done in the HIVE, this really goes through each and every site collection that uses the default master! Also, this might be overriden with updates - just like potentially every change made in the hive.

Mar 17, 2009

Redirect now, not in 5 secs

SharePoint publishing portal has this useful page type, the redirect page.By using redirection pages, you enable contextual navigationand thus an easier user experience. The data is in one place, and one place only, but can appear in multiple places. The concept is simple: create a new redirect page to the site where the data should contextually appear (as well as in it's original place) and fill in the URL of the target site/page.


But, for some reason the redirection delay is set for 5 seconds, by default. Which creates a somewhat awckward experience for the end user. And unfortunately this can't be changed anywhere in the page settings. Yet, fortunately, it is not hard coded into the very sole of the control, but actually is very easily changed by changing the value of the delay-attribute of the control.

The redirect page is based on the redirect page layout. It is stored in the Site Collection Master Pages and Page Layouts gallery and can be opened in SharePoint Designer. Of course, modifying the page layout will effect every redirect page in the Site Collection, but then again, only in that one Site Collection. So, if you need a 5 sec delay on one page and rather have no delay on another page, the simple answer is to copy-paste-rename the redirect page layout in the gallery.

Anyhow, the small operation for changing the delay is to open the redirect page layout (RedirectPageLayout.aspx is the original one) to be modified e.g. in SharePoint Designer, go to the code view and set the attribute:

PublishingWebControls:RedirectControl SecondsBeforeRedirect="5"


Set the value of the SecondsBeforeRedirect to any number of seconds - it can also be 0 (zero). But note that when there is no actual redirection delay, the page is not available for modification except via the page library (because it does not show in the browser long enought to be opened for modifying).

Jan 14, 2009

Implementing Master Pages and Page Layouts

When branding a SharePoint site, the two main elements to modify are the master page - oh, you can always have several but I if you can do with only one, go for it - and the page layouts. Modifying or designing and building them from a scratch is one story, which I will probably be visiting some other time in some other post in more detail, and the implementing of these is another one, and the main topic of this post.

Independent of whether you modify the original master pages and page layouts or build your own, you have basically two options in implementing them on the SharePoint site collection. And the third one, when building a whole solution for a customer, e.g.

1)
Your first option is to open your SharePoint site collection in SharePoint Designer and navigate to the _catalogs\masterpage folder that contains all the original master pages and page layouts. As it is, you can now duplicate any of these by a simple copy-paste of the whole file and then modify your copies, or create whole new pages from the scratch and save them in the folder (just remember that SharePoint is very sensitive by way of adequate references etc. in the pages!). All the attached files like pictures and stylesheets can be stored in the site collection Style Library, which you can also access in SharePoint Designer.


Which ever way you create the pages, they are ready to use as soon as you check them in, publish and approve them (right-click on the file name in the folder list and SharePoint Designer takes you through the rest of it). After this, you can switch to the browser and, as for the master page, apply it to you site collection in the site settings of the site collection, choosing Master Page in the Look and Feel category. Remember to set the inheritance right - but don't be surprised when the new team sites don't use the set master page, for they don't.


As for page layouts, they're ready to be used when creating a new publishing page on any given publishing site in your site collection. This ok, but not very easily recreated in case of need to duplicate or reconstruct the site collection.

2)
You can do this same thing also as a feature. You can even make most of the modifications in SharePoint Designer if you wish. But the building doesn't start in SharePoint Designer, it starts in SharePoint HIVE (that is Program Files\Common Files\Microsoft Shared\web server extensions\12). In HIVE, there is a folder that contains all the example master pages and page layouts that can also be found in the master page gallery of the site collection. This folder is HIVE\TEMPLATE\FEATURES\Publishing Layouts. In order to create your own feature of master pages, page layouts and related files, duplicate this folder (copy-paste).

Rename your copied folder and then navigate into it. The two xml files in the root of the folder, feature.xml and provisionedfiles.xml are files you definately need so don't delete them. But what comes to all the other files, inside the subfolders, you can either delete them, or use them or some of them to make your own master page and page layouts. In theory, you can do the modifications in SharePoint Designer, but I highly recommend opening the files in Visual Studio instead. If you need to test drive the pages, set up a test site collection and in it, do as explained in scenario 1) but copy the code between Visual Studio and SharePoint Designer instead of copying the whole files.

Save all the other files like pictures and stylesheets in the folders of your own feature.

The installing of a feature needs to be done as an stsadm-command, and after that, the feature needs to be activated in your site collection. After doing this, you will find the master page in the master page gallery, same as above, in scenario 1.

Since Heather Solomon has done such a fabulous job on describing the steps of creating your own feature, I will not go into it in my entry, but rather recommend on reading hers for more detailed description:
http://heathersolomon.com/blog/articles/servermstpageforsitecollect_feature.aspx

3)
The third sceanrio is one of building a site collection from a scratch, with the help of a solution, or, simply implementing the feature as a complete solution. This requires VisualStudio plus the additional tools and e.g. wspbuilder, in order to create a site definition or other sort of SharePoint solution. When building a customer solution, this is the most convenient scenario of these three options. I will be back to this topic sometime later on.

Nov 17, 2008

Simplifying calendar booking

A customer of mine had this question about enhancing a booking calendar on a SharePoint 2007 website. They had a basic team site with a basic calendar on it, but they wanted to make it more simple for the users to make a new event or booking, than to force them to use the New button and the basic New Item Form with several unnecessary fields in it. Also they wished for the form to be on the same page with the calendar so free dates could be viewed simultaneously with filling in the form.

So I took to figuring out the easiest and most convenient way of doing this. After fiddling with dataviews and forms and coming to the conlusion that they, in fact, were not what I wanted and needed, I decided on inserting the calendar webpart to the aspx-page in calendar view and then inserting a custom list form beside it in SharePoint Designer.

I actually ended up doing this from a scratch, on an empty aspx-page. First, I created a table inside the PlaceHolderMain, then inserted the calendar web part in the left hand cell by dragging and dropping it from the web parts task pane.


Then I selected the table cell on the right hand side and inserted the List Form in it (Insert > SharePoint Controls > Custom List Form).


Select to use the Calendar on the site and the New Item Form. I didn't want the Attachment and Spelling buttons on the form, so I also deselected the Show standard toolbar checkbox.

Now, the form needed some editing for it had way too many fields in it. So I selected the rows containing data that was not needed and deleted the rows by right-mouse-clincking them and selecting Delete > Delete Rows. But beware not to delete the requiered fields (marked with the stars).


Once the form contained only the necessary fields, it was time to test it in the browser. It was nice and neat and worked as it should.

Sep 19, 2008

But hey, we're not Adventure Works!

Using and editing the alternative master pages of MOSS, situated in the Master Pages and Page Layouts gallery on a site collection, is a handy get-away to a different look of the MOSS site without too much handy-work to be done. Oh, okay, the css-style-stuff is always rather time-taking and sometimes downright frustrating, but it's still easier than building your own master page alltogether. Maybe.

Anyhow, some of those master pages, e.g. OrangeSingleLevel.master, contains example data labeled Adventure Works. For example, the "logo" in this specific master, is text instead of a logo image file, so changing the logo file on the server does no good to changing the company name on the page.


We're down to three options, a couple simpler ones and one involving a little bit of coding. I'm not going into the coding-scenario in this entry, maybe later on in another one, but let's take a look at the two simpler possibilities.

First one is to simply delete alla the AdventureWorks related data on the master page. In addition to the company name, e.g. this particular master page contains address and phone number etc. data in the bottom of the page.


This, and the company name at the top of the page, are rendered to the page by an asp-control via an resx-file that contains the data shown.


(code not an actual excerpt but as listing of the asp-control references)

Deleting these controls in the ht
ml-code rids you of the AdventureWorks -based data for good and you can add your own logos and text straight to the html-code.

But, you might as well want to modify the data provided to the page by editing the resx-file containing the data. The files are cms_[LCID].resx resource files and their originals are situated in SharePoint HIVE\CONFIG\Resources (C:\Program Files\Common Files\Microsoft Shared\web server extensions\12\CONFIG\Resources).

Anyhow, each web application uses a set of copies of these files, so the actual files to modify are situated in the C:\Inetpub\wwwroot\wss\VirtualDirectories[Port]App_GlobalResource. Thus, the options are to modify the original files (for further use also, e.g. when new web applications are created) and copy these files to the App_GlobalResources, or to modify the web application specific files
.

The data to modify is inside the data-elements with name-value same as the asp-reference shown above, e.g.


The cms_[LCID].resx-files can be opened to e.g. Notepad for editing. Change the value for each data and you have your own company information on the master page.

Sep 3, 2008

Restricting Usage of Site Templates in SharePoint

SharePoint Site Collections enable restriction of site templates and page layouts via a simple modification on site settings in the browser. Go to the site settings of a single site or the site collection main site (Site Actions > Site Settings > Modify All Site Settings) and choose Look and Feel -ryhmästä Page layouts and site templates.

This setting can be modied in Publishing Sites or wss-sites with publishing features activated (these features can be activated in site settings:: Site Actions > Site Settings > Site Features, Office SharePoint Server Publishing > Activate, note that this setting is not inherited by subsites).

On the Page layouts and site templates page the usage of site templates and page layouts can be set in three different ways:

  1. Set subsites to inherit templates or layouts from parent site (the site where the setting is modified)
  2. Give the subsites permission to use any templates or layouts
  3. Give the subsites permission to use only specifically determined templates or layouts

Subsites can be reset to inherit these settings by selecting Reset all subsites to inherit… The setting is inherited by existing publishing and wss sites and new publishing sites, but not new wss sites.

If this seems insufficient, one can always take up more severe measures in restricting usage of Site templates and page layouts.

Page layouts aren't a problem, really, since by spcifying the permitted page layouts in the settings of the site collection and inheriting the settings to subsites, the setting really goes all the way through the site collection. And if you want to, you can always manage them further in the Master Page and page layout gallery (in site collection settings Site Actions > Site Settings ja Galleries > Master pages and page layouts) and delete (or move to another location) the page layouts that are not to be used at all:

Site templates, on the other hand, require the tampering of a set of XML files - those of customized Site Definitions (if there are such) and those managing the templates of the whole Web Application.

On the SharePoint server, the \Program Files\Common Files\Microsoft Shared\web server extensions\12\TEMPLATE\1033\XML directory contains these XML files to modify. Of these, the WEBTEMP.XML file is the one containing settings for site templates, except for the Publishing and Enterpise tabs. Templates can be hidden from view & thus from usage by setting the value of the attribute Hidden to be "TRUE" on those templates you wish to hide.

This is actually the only supported action in these XML files - and even this is an exception (More about Microsoft Supported ja unsupported scenarios on the Microsoft site: http://support.microsoft.com/default.aspx/kb/898631 ).

Hiding templates on the Publishing tab is done similiarly in the webtempsps.xml file. The Enterprise tab is a tad more complex thing to modify, as each template has its own XML file, but they are all situated in the same XML directory with these already mentioned files.

Own tabs can be created - or the existing ones "renaimed" (but as a reminder, this is not officially supported) by setting the value of the DisplayCategory attribute: DisplayCategory="Own tab name" in the XML files.

After this, one question remains: how to make the site templates saved in the browser (in the site settings of a wss site Look and Feel > Save site as template) to appear on a tab not named Custom?

The name of the Custom tab can be changed by modifying the value of TemplatePickerControl_Custom in the \Program Files\Common Files\Microsoft Shared\web server extensions\12\Resources\core.[en-US].resx file:

Remember to make backups before tampering with the original files! And after modifying the files, be sure to perform iisreset in order to apply the changes.