<Property Name="ContentType" Value="$Resources:cmscore,contenttype_pagelayout_name;" />
Showing posts with label PageLayouts. Show all posts
Showing posts with label PageLayouts. Show all posts
Apr 17, 2014
Tip: Page Layout Content Type Language Resource
Just a short note. I have been using the Page Layout string as the ContentType value for page layouts in the Elements.xml manifest, when creating new page layouts within a UI package Quite many of my customers, however, prefer their sites in Finnish. The Finnish equivalent is "Sivun asettelu" and usually this works fine, but not always. The better practice however (and a must in a multilingual environment) is to use the resource-string as the value for ContentType:


Jan 15, 2013
How to Create HTML Page Layouts for SharePoint 2013
Just like in SharePoint 2010, you can create custom PageLayouts in SharePoint Designer or Visual Studio as .aspx files, either from the scratch or by copying an existing PageLayout and modifying the copy. These files can be included either in a branding solution or a design package. But in SharePoint 2013 also PageLayouts can be created as HTML files and converted to PageLayouts in Design Manager.
- Create a starter PageLayout in Design Manager
To get started with your custom HTML PageLayout, you need to create a starter PageLayout in Design Manager and edit the HTML file created in the process. Note that this also creates the .aspx file, do not edit that file!
So, navigate to Design Manager (Gear-menu > Design Manager) and click on Edit Page Layouts. Click on Create a PageLayout. Type a name for your PageLayout and select the default MasterPage and Content Type for the PageLayout.
- Open the HTML file for editing
Navigate to the MasterPage Gallery (Site Settings > Galleries > Master Pages and Page Layouts) in SharePoint Designer 2013 and open the created .html PageLayout file for editing or download a copy of the file and edit & upload back to gallery after editing or create a mapped folder of the gallery and open the file for editing in your application of choice. - Replace the default page layout structure with your own
To create your own layout structure for the PageLayout, clear all the content inside the
<!--MS:<asp:ContentPlaceHolder ID="PlaceHolderMain" runat="server">-->
...
<!--ME:</asp:ContentPlaceHolder>-->
tag, and insert your own HTML code there instead:
- CSS styles?
If you are using your own custom MasterPage that already points to a custom CSS stylesheet, you can add the CSS styles for the PageLayout in that same stylesheet. The browser reads the stylesheet when it loads the MasterPage.
If you want to create the PageLayout styles independent of any MasterPage, or you don't have one, you can insert styles or a link to a separate stylesheet in the PageLayout's ContentPlaceHolder AdditionalPageHead:
<!--MS:<asp:ContentPlaceHolder id="PlaceHolderAdditionalPageHead" runat="server">--> <link href="SCpagelayoutstyles.css" type="text/css" rel="stylesheet" ms-design-css-conversion="no"/><!--CE:hide left navigation--><!--MS:<style type="text/css">-->
<!--#sideNavBox{ display:none;} #contentBox { margin-left: 20px!important;}-->
<!--MS:</style>--> - Add SharePoint controls as snippets to your PageLayout
In Design Manager, click the PageLayout file link to open it in preview. Click the Snippets-link in the upper right corner o the page, to open the snippet gallery page.
On the snippet gallery page, select the controls (one by one) you want to add on your PageLayout, customize the properties if needed and copy and paste the code snippet on your page.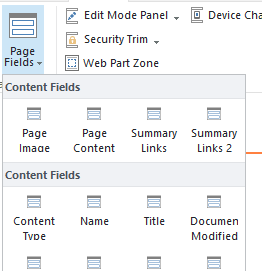

To insert multiple similar controls or fields on the PageLayout, e.g. multiple Web Part Zones, use the Reset button in between to genereate new IDs for each control/field.
Save your work and refresh the preview to check out the changes. - Publish and start using your PageLayout
When you are happy with the outcome, close the HTML file and Snippet gallery, and navigate to the MasterPage Gallery. Publish the HTML PageLayout file by using the dropdown menu of the file. You might also want to add a friendly title for the PafeLayout by editing its properties; do this before you publish the PageLayout.
Then navigate to a page where you want to use the PageLayout and select Edit Page in the Gear menu. Select your PageLayout in the PageLayouts dropdown on the Ribbon Page tab.


The Anatomy of SharePoint 2013 Display Templates
How to Deploy Display Templates via SharePoint feature]
How to Deploy Display Templates via SharePoint feature]
Apr 25, 2012
Tip of the Day: Intellisense for MasterPages
How ignorant can you sometimes feel? All the time while working with SharePoint 2010 MasterPages and PageLayouts in VisualStudio, for two years now, I have been cussing the lack of intellisense on those pages on a regural basis. I have even complained about this out loud and asked advice from others - never finding or getting any solution to this.
Then, only last Friday, I was helping out a guy who is relatively new to SharePoint branding and development etc. and had been trying out this and that in VisualStudio to help him get along - and avot! He had found the solution to the problem. Maybe it is old stuff to you already, but it was a life-saver for me!
In the Solution Explorer, right-click on the MasterPage/PageLayout file missing intellisense, select View Markup. That does it, pals!
Jan 18, 2012
Creating a Custom UI Solution for SharePoint
To create a custom UI solution for SharePoint 2010, create a new project in VisualStudio2010, using the project template Empty SharePoint Project. Remebmer to set the Framework to 3.5!

Next steps are to the SharePoint SiteCollection you are using for testing, and to choose between Farm or Sandbox solution. I usually use the Farm Solution unless Sandboxing is required, because I prefer the Layouts folder for the stylesheets and images over the Style Library of an individual SiteCollection. Sandbox solution does not have access to the Layouts folder.
After the project has been created, add the mapping of the Layouts folder if you are creating a Farm solution:

or add a new module with the name StyleLibrary if you are creating a Sandbox solution:

Mapping the Layouts folder automatically creates a folder for your custom stylesheets etc. Inside this folder, create another one, Images.

The StyleLibrary module needs the same, so create a folder for your custom stylesheets, and one for the Images too. Also, delete the Sample.txt file from the module, it is not needed.
Add a stylesheet to the UI.Assets folder, New Item > Style Sheet from the Web category:

If you are using the StyleLibrary, you need to check your Elements.xml now. The Module-node should look something like this:
Module Name="StyleLibrary" Url="style library"
File Path="StyleLibrary\Showcase.UI.Assets\SandboxSC.core.css" Url="StyleLibrary/Showcase.UI.Assets/SandboxSC.core.css"
When you add images in the Images folder, check your Elements.xml file if using the StyleLibrary. There should be a new File-element for each image, e.g.
File Path="StyleLibrary\Showcase.UI.Assets\Images\Logo.gif" Url="StyleLibrary/Showcase.UI.Assets/Images/Logo.gif"
Next let's add the MasterPages module. If you have installed the CKSDev tools, you can add a new CKSDev MasterPage (in this case, see more about using the CKSDev Starter Master Page), or add a new empty Module and name it MasterPages, in a similar way as the StyleLibrary module was added. Again, delete the Sample.txt file.
Add a starter MasterPage file to the module. You can use any OOB SharePoint MasterPage as a starting point (download a copy from the MasterPages Gallery), but I highly recommend to start with the a starter MasterPage from the Starter MasterPages by Randy Drisgill. There are starter files for publishing sites and foundation sites, pick the correct one for the correct purpose.
After adding the first MasterPage, rename it if needed and then edit the Elements.xml file:

First thing to do with the newly added MasterPage is to create (or change) the custom CSS reference. In the starter MasterPages, this is ready for you:

When using the StyleLibrary, the reference would be like this:

Last thing before initial testing of the solution is to prepare our feature. Two things: rename it and set the scope. First rename the feature in the solution explorer, then double-click it to set the title and the scope:
- Web, if the feature should be activated separately on each site - good for cases where not all sites need the same UI assets, or you want to activate the UI by using feature stapling with custom site templates
- Site, if the feature should be used for the whole SiteCollection - only one activation required, for efficient use, create also a feature receiver and an event receiver for when sites are created

The base for the branding solution has now been laid.and the solution is ready to be tested. Right-click on the project name in the solution explorer and click Deploy. This both deploys the solution and activates the feature. When deploy is done, go to your site and set the MasterPage for the site - and start working with it!
Since I do not use SharePoint Designer for any UI customizing, I need to deploy, re-deploy and so forth, the solution as I make changes. My method is to deploy the initial solution, as it is, and then start working with the sites in Firefox, using Firebug to try out the css when necessary before writing it in the css file. And of course the MasterPage needs a whole lot of html! The easiest way to apply changes to the SharePoint site after the initial deploy, is to use the Quick Deploy tool of the CKSDev tools.
When it is time to add PageLayouts, add a new module like with MasterPages. Download a copy of the most suitable OOB PageLayout from the MasterPages Gallery, and add the file to the module. Edit the Elements.xml; for one PageLayout should look something like this:

For information on creating a feature receiver and event receiver for a UI solution, see Setting MasterPages to Sites Automatically.
Mar 17, 2009
Redirect now, not in 5 secs
SharePoint publishing portal has this useful page type, the redirect page.By using redirection pages, you enable contextual navigationand thus an easier user experience. The data is in one place, and one place only, but can appear in multiple places. The concept is simple: create a new redirect page to the site where the data should contextually appear (as well as in it's original place) and fill in the URL of the target site/page.
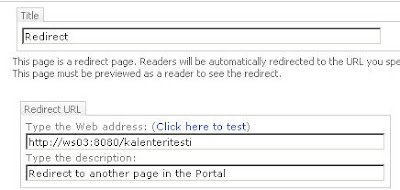
But, for some reason the redirection delay is set for 5 seconds, by default. Which creates a somewhat awckward experience for the end user. And unfortunately this can't be changed anywhere in the page settings. Yet, fortunately, it is not hard coded into the very sole of the control, but actually is very easily changed by changing the value of the delay-attribute of the control.
The redirect page is based on the redirect page layout. It is stored in the Site Collection Master Pages and Page Layouts gallery and can be opened in SharePoint Designer. Of course, modifying the page layout will effect every redirect page in the Site Collection, but then again, only in that one Site Collection. So, if you need a 5 sec delay on one page and rather have no delay on another page, the simple answer is to copy-paste-rename the redirect page layout in the gallery.
Anyhow, the small operation for changing the delay is to open the redirect page layout (RedirectPageLayout.aspx is the original one) to be modified e.g. in SharePoint Designer, go to the code view and set the attribute:
PublishingWebControls:RedirectControl SecondsBeforeRedirect="5"
Set the value of the SecondsBeforeRedirect to any number of seconds - it can also be 0 (zero). But note that when there is no actual redirection delay, the page is not available for modification except via the page library (because it does not show in the browser long enought to be opened for modifying).

But, for some reason the redirection delay is set for 5 seconds, by default. Which creates a somewhat awckward experience for the end user. And unfortunately this can't be changed anywhere in the page settings. Yet, fortunately, it is not hard coded into the very sole of the control, but actually is very easily changed by changing the value of the delay-attribute of the control.
The redirect page is based on the redirect page layout. It is stored in the Site Collection Master Pages and Page Layouts gallery and can be opened in SharePoint Designer. Of course, modifying the page layout will effect every redirect page in the Site Collection, but then again, only in that one Site Collection. So, if you need a 5 sec delay on one page and rather have no delay on another page, the simple answer is to copy-paste-rename the redirect page layout in the gallery.
Anyhow, the small operation for changing the delay is to open the redirect page layout (RedirectPageLayout.aspx is the original one) to be modified e.g. in SharePoint Designer, go to the code view and set the attribute:
PublishingWebControls:RedirectControl SecondsBeforeRedirect="5"
Set the value of the SecondsBeforeRedirect to any number of seconds - it can also be 0 (zero). But note that when there is no actual redirection delay, the page is not available for modification except via the page library (because it does not show in the browser long enought to be opened for modifying).
Subscribe to:
Posts (Atom)