Showing posts with label Branding. Show all posts

May 18, 2016

Search Results vs. Content Search Web Parts: customizing and date formatting

The default way to display feeds from news, events etc. on an intranet front page is to use the Content Search Web Part. Used to be Content Query, but customizing the CQWP is way more complicated plus it is restricted to the same Site Collection only. This is still used, as is, by many of my customers, for it is easier for content managers to set up than the search queries. Anytime any custom templates are needed (or when I am setting up the feeds), definitely CSWP is the way to go.

Lately, though, I have had several customers with SharePoint Standard lisence only. Unfortunately this leaves out the CSWP completely. Search indexing and search driven content is still available, but building those said feeds is just a tad more complicated for you need to use the Search Results Web Part, which is not created for this kind of usage, even though it CAN be used. It requires some more work, but once you've figured out the basics, it's not that difficult. Just a bit different than the CSWP.

The display templates of CSWP consist of a control template and an item template (for more info, see my post "The Anatomy of SharePoint 2013 Display Templates"). Mostly the modifications and customizations are rather straightforward to make by following the example of things already there. The date formatting, however, is a bit tricky. What you need to do is:

1) Copy the item display template you want to modify from MasterPages gallery, Display Templates, Content Web Parts directory.

2) Create a managed property of the field you want to use, if not using Created or LastModifiedDate, in Search Schema.

3) Use the date field as value for desired line data, eg:

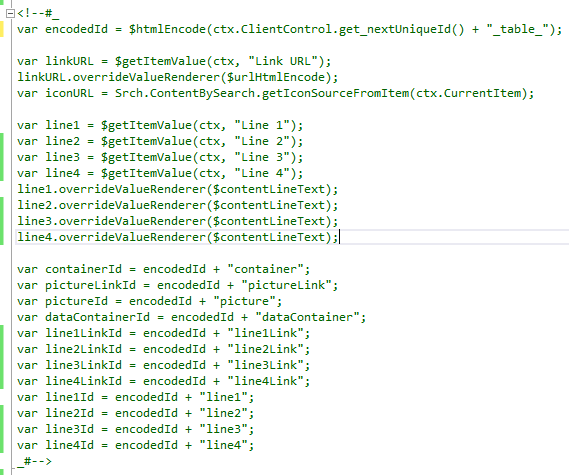
var line1 = $getItemValue(ctx, "Line 1");
var line2 = $getItemValue(ctx, "Line 2");
var eventdate = new Date(line2.inputValue);

4) Format the date as you wish in the HTML where the value is rendered:

 <div class="cbs-Line2 ms-noWrap" title="_#= $htmlEncode(line2.defaultValueRenderer(line2)) =#_" id="_#= line2Id =#_">_#= eventdate.format("d.MM.yyyy H:mm") =#_</div>

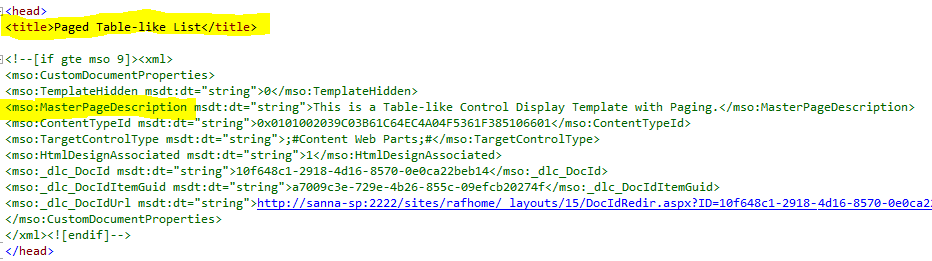
5) Upload your display template (remember to change the title in the HTML and rename your modified file) back to the same folder in MasterPages gallery and publish it. It's ready to be used.


As for the Search Results web part, the system is slightly more tricky. First off, there are more display templates involved: 
  • Control templates
  • Item templates
  • Item HoverPanel templates
Mostly, you need to work with Item templates and/or hoverpanel templates, if using the hover panel. In the case of displaying feeds on front page, the hover panel is seldom wanted. It can be removed. Simply delete highlighted parts from the display template you copied, eg. ItemDefault (note, that the Search Result templates are in the Search folder):

<div id="_#= $htmlEncode(itemId) =#_" name="Item" data-displaytemplate="DefaultItem" class="ms-srch-item" onmouseover="_#= ctx.currentItem_ShowHoverPanelCallback =#_" onmouseout="_#= ctx.currentItem_HideHoverPanelCallback =#_">

And then comment out the following line:

 <!--  <div id="_#= $htmlEncode(hoverId) =#_" class="ms-srch-hover-outerContainer"></div> -->

Other modifications that I have found useful and quite necessary in said use case are
  • removing the item URL - actually in default item template I just remove the whole default body render tag:
    _#=ctx.RenderBody(ctx)=#_
  • building your own stuff to show for each item, e.g. rollup image, a content summary, publish/create date eg. 
Adding fields to the display template is simple enough. The fields need to be managed properties in Search Schema, so remember to do this first for any custom fields. Then you add the properties to the template mso:ManagedPropertyMapping tag:

<mso:ManagedPropertyMapping msdt:dt="string">'Title':'Title','Path':'Path','Description':'Description','EditorOWSUSER':'EditorOWSUSER','LastModifiedTime':'LastModifiedTime','CollapsingStatus':'CollapsingStatus','DocId':'DocId','HitHighlightedSummary':'HitHighlightedSummary','HitHighlightedProperties':'HitHighlightedProperties','FileExtension':'FileExtension','ViewsLifeTime':'ViewsLifeTime','ParentLink':'ParentLink','FileType':'FileType','IsContainer':'IsContainer','SecondaryFileExtension':'SecondaryFileExtension','DisplayAuthor':'DisplayAuthor','Created':'Created','NewsSummary':'NewsSummary', 'PublishingImage':'PublishingImage' </mso:ManagedPropertyMapping>

Then you use this to build your own HTML for the items, eg.

<div id="_#= $htmlEncode(itemId) =#_" name="Item" data-displaytemplate="DefaultItem" class="ms-srch-item">
    <div class="newscontainer">
<div class="newstitle">
<a href="_#=ctx.CurrentItem.Path=#_">
_#=ctx.CurrentItem.Title=#_
</a><br>
               <span class=newsdate>
              _#=ctx.CurrentItem.Created=#_
</div>
<div class="newsbody">
<div class="newsimg">
_#=ctx.CurrentItem.PublishingImage=#_
</div>
<div class="newstext">
_#=ctx.CurrentItem.NewsSummary=#_
</div>
</div>
</div>

Note the date there, though. It will give you a very long date format by default, but in a Search Results template it is way easier to format the date than CSWP. Simply add format(yourdiesiredformatting) to the value in HTML. Like this:

_#=ctx.CurrentItem.Created.format("d.M.yyyy")=#_


Then there is only one little nuisance left: the hover background color. 


This comes from this CSS rule: 

.ms-srch-item:hover, .ms-scrch-resultHover:hover, .edisc-SearchResultItemContainer:hover{
background-color: rgba(...);
}

Now, if you override this as is, it will effect the search results pages too. So try to identify the targets in some way, use eg. .welcome or .article classes for targeting content pages only in removing the hover color.

Whew! All done!

Mar 18, 2016

SharePoint Branding and the winds of change

Not that long ago, it was quite typical to create a major SharePoint UI solution for a SharePoint intranet. It would contain one or more Master Pages, CSS stylesheets, images, JavaScript, Page Layouts etc. The solution package was deployed to the server, the feature activated and automagically the intranet got its fancy custom UI and functionalities. A slight inconvenience though, that even the smallest change or improvement in any of the shipped files required updating the whole package.
It hasn’t been too long since I last was involved in such a big intranet solution. These days such projects are more of the exception than the rule. So, what’s changed?

One thing, or maybe I should say THE thing is Office 365. Cloud is becoming more and more popular and doesn’t even allow such huge full-trust solutions. Sandbox solutions are still an option, though according to Microsoft they are not the technology of the future – they already once declared them deprecated, but actually had to take it back pretty quickly. However, apps and other alternative ways of doing things (PowerShell, Azure powered functionalities etc.) are the modern and flexible way to build stuff on top of SharePoint, while keeping it separate from SharePoint.

I believe it’s not inaccurate to say that all the rest is just a byproduct of this. While more and more companies are switching to the cloud environments and Microsoft is developing “cloud first”, it is only natural for attitudes and ways to adapt to this change. Lightweight tweaking as opposed to heavy – especially with a heavy update process – custom software development sounds quite enticing.

Years ago, when SharePoint 2010 was launched and companies started to migrate from the old 2007 environment to the shiny new SharePoint in a fast pace, the game of the day was using OOB where ever possible and doing as little customization as possible. Mostly this still meant creating easily retractable solution packages for UI and custom web parts and services, distributed as features. SharePoint wasn’t re-coded anymore as it used to be in many cases with MOSS 2007; the solutions were built on top of SharePoint without touching the OOB stuff.

Then, along came SharePoint 2013. For quite some time the development and customization story was pretty same as with 2010, up until Online made its breakthrough and started to mold the models towards the more lightweight facelifts, apps, external services etc. The process of UI customization, branding, has shrunk from a heavy solution package to creating themes, some custom CSS and maybe a bit of JavaScript.

A color theme is a rather easy and quick way to apply the company branding colors to SharePoint. It already takes you a long way – the company colors are applied to the top suite nav, links, emphasis colors, headings etc. Creating a font scheme adds to this by implementing the company font – even a custom one – everywhere with one setting. What cannot be done by a theme is changing the placement and fancier styling of page elements.

The current default Master Pages seattle and oslo are built using div elements. This means that working with them – the placement, float, etc. – is pretty flexible and easy without needing to change the HTML of the Master Page, i.e. there is no need to create custom Master Pages simply to change how and where the elements are rendered on the page. There are limits to this, but you can do a lot with CSS.


Themes and an alternate CSS stylesheet are easy to implement in the UI of SharePoint, in the site settings, and they are inherited by any subsites with publishing feature activated. Implementing them to sites without publishing feature is a bit more work. Generally, this means pushing the inheritance from the top level each time a new site has been created.

JavaScript adds its own challenge to the equation. It is possible to globally inject JavaScript to all sites in a site collection using PowerShell. However, this should then be done for each new site too, when one is created. In single pages the Script Editor Web Part works nicely, but the global injection is always a bit of an issue. Mainly the options apart from the manual PowerShell injection are adding the script links to the Master Pages or creating an Azure powered service for provisioning the sites. 

The latter option is actually something to consider. Basically the idea is that people don’t create their sites manually but order them by creating a new item into an order list. A timer job polls the list and notices a new site order and launches a PowerShell script that then provisions the site with the exact settings, stylesheets, logos, Web Parts, lists, JavaScript links that are needed for each new site. 

Add responsive design to the equation. Currently SharePoint Online offers two view for mobile devices and the possibility to switch between them. One is the mobile list oriented view, the other one the full desktop view. The list oriented view works fine in team sites where all the content is mainly in lists, but publishing sites, the informative intranet pages, need to be viewed in full desktop experience on mobile devices too – in a responsive way so that it actually is readable.

Unfortunately, responsive SharePoint is still a bit of a everyone for their own – or has been, but I have just discovered that PnP has actually come forth with an awesome fully responsive solution that is purely CSS based! Previously the options have been e.g. bootstrap (heavy version), a responsive SharePoint solution from Codeplex (kinda heavy solution too); both of these require changes to the MasterPage. A bit of a no-no. 

Be as it may, responsive design is always more expensive for a customer than the basic design only. However, as the costs of branding have come down significantly with the lighter approach, it most definitely pays off to invest in responsive design, if not go mobile first. That’s where this world is headed anyway. 

[Originally published in Finnish in our company blog]

Dec 10, 2015

Tip: Targeting a specific SharePoint site with global CSS

Just a little css tip, that came out handy today. Generally, with a global css (say, an alternate style sheet that is deployed throughout the site collection), you don't even attempt targeting some specific site, but go with the global styles instead. Today, however, I was struggling to display the titlerow (logo and navigation) in the enterprise search center without having it become visible in the dialogs as well.

Some Microsoft logic it is, I guess, that the search center by default hides the site collection navigation using the same class as the dialogs, the .ms-dialogHidden. And as anyone working with SharePoint CSS knows, the sites have no IDs in the body tag so that you could e.g. tell your css to display the navigation in search site but not in the dialogs. None, except for the action attribute in the form tag.

I guess it never was as big of an issue before, since I never thought of it before, but indeed, in a site collection already populated with sites, you can target one specific site by using the attribute selector for form tag in your css rule, for the form action contains the relative address of the site in it + in SharePoint, the whole page is always inside of that form tag. So here's the rule for un-hiding the titlerow for this specific search center, just as an example:

form[action*="searchcenter"] #s4-titlerow.ms-dialogHidden {
    display: block !important;
}

And, yey, the dialogs remain untouched and furthermore, there is no need to impelemnt page level css on each and every search center page.

Jun 25, 2015

Open documents in Office Web Apps from CSWP

One of my customers has a Content Search Web Part in their intranet home page, listing both documents and pages. They have Office Web Apps installed and are quite happy with the way documents open to OWA instead of the desktop client from the document library and search results. The CSWP, however, does not natively support opening documents in the OWA, so a bit of display template modification is required.

I was already using rather heavily modified item display template for the customer, so I simply needed to modify that one, but you can also copy any item display template (from the Master Pages gallery, Display Templates > Content Web Parts folder) that best fits your purposes and modify the copy. Mind you, you only copy the html template, modify it, save it with another name and upload it back to the library. The .js file will be automatically created.

The things you need to do to your display template in order to enable opening documents in OWA are: 

1) Add the managed property 'ServerRedirectedURL' to the managed properties: 


This is the property that provides the open in OWA url for documents. You could use this as a simple property for the LinkURL, but if you cannot be certain that each and every document that gets listed in the CSWP is in fact an office document, you need to add a bit more code to the template.

2) Right there, where the commented code of the display template begins, below the var encodedId line, insert the following code I intecepted from the common search result item template:

var useWACUrl = !$isEmptyString(ctx.CurrentItem.ServerRedirectedURL);
        if(ctx.ScriptApplicationManager && ctx.ScriptApplicationManager.states){
            useWACUrl = (useWACUrl && !ctx.ScriptApplicationManager.states.openDocumentsInClient);
        }
        var appAttribs = "";
        if(!useWACUrl)
        {
            if (!$isEmptyString(ctx.CurrentItem.csr_OpenApp)) { appAttribs += "openApp=\"" + $htmlEncode(ctx.CurrentItem.csr_OpenApp) + "\"" }; 
            if (!$isEmptyString(ctx.CurrentItem.csr_OpenControl)) { appAttribs += " openControl=\"" + $htmlEncode(ctx.CurrentItem.csr_OpenControl) + "\"" };
   
        }
        var url = ctx.CurrentItem.csr_Path;
          if($isEmptyString(url)){
            if(useWACUrl)
            {
                url = ctx.CurrentItem.ServerRedirectedURL;
    
            } else {
                url = ctx.CurrentItem.Path;
   
            }        
        }

3) Then modify the LinkURL variable to use the url instead of the default Path:
var linkURL = $urlHtmlEncode(url);

4) Finally, remove the line
linkURL.overrideValueRenderer($urlHtmlEncodeValueObject);

And that's it, folks.

Sep 3, 2014

Using a Custom Logo in HTML MasterPages

The Eureka-moment of the day. I admit that I have mostly avoided this whole issue after the intial notion that it just did not work - mostly because I have avoided working with HTML MasterPages alltogether since I don't really like them; I'm much more at home working with the actual .master file (and mind you! it can also be used in a Design Package - that is, creating a Design Package does not mean that you need to use HTML Master Pages; rather, they are an option).

Today I was working with new labs for my Branding trainings and finally decided to take the bull by the horn and try my luck again at figuring out the proper way to actually get your own logo as default logo in the Site Logo snippet. And I did figure it out. It's really nothing new; I just hadn't thought about it this way before. 

If I create a VisualStudio Branding solution, I prefer the 15-hive over placing the files in _catalogs/masterpage. But as it goes, this is not avoidable in all situations, so I, too, have made solutions with all the assets in the MasterPage gallery. So today I gave this logo issue some more thorough thought and got it. The link in the snippet properties needs to be in the same form as it would in my own MasterPage, when the logo is located in _catalogs/masterpage.

In essence: for an HTML MasterPage, store your assets (logos, css stylesheets etc.) in your own folder in _catalogs/masterpage to ensure that they are packaged with the Design Package. When you use the logo in the Site Logo snippet, set the SiteLogoImage url in the following form:
&#60;% $SPUrl:~sitecollection/_catalogs/masterpage/designpackagefiles/dp_logo.gif %&#62;
(or <% $SPUrl:~sitecollection/_catalogs/masterpage/designpackagefiles/dp_logo.gif %>)


As for the CSS file link, that is much more straightforward. The href url can simply be of the form folder-in-catalogs-masterpage/stylesheetname.css, e.g.
<link rel="stylesheet" type="text/css" href="designpackagefiles/DesignPkgStyles.css">

Note, that the CSS link needs to be outside of all the MS-commented sections; the safe place for it is right before the closing </head> tag!

Apr 17, 2014

Tip: Page Layout Content Type Language Resource

Just a short note. I have been using the Page Layout string as the ContentType value for page layouts in the Elements.xml manifest, when creating new page layouts within a UI package Quite many of my customers, however, prefer their sites in Finnish. The Finnish equivalent is "Sivun asettelu" and usually this works fine, but not always. The better practice however (and a must in a multilingual environment) is to use the resource-string as the value for ContentType:

<Property Name="ContentType" Value="$Resources:cmscore,contenttype_pagelayout_name;" />

Mar 20, 2014

Using SlickNav with SharePoint

Responsive design in the word of the day, and recently full responsiveness has become more and more required in intranets too, and not only in Internet sites. This led me to trying out the SlickNav with a SharePoint site of a customer, and was happily surprised, when everything mostly went in a truly slick manner! Anyone working with SharePoint will, however know, that slick with SharePoint has a whole different meaning than slick in a simple HTML+CSS web site. So a few notes from my journey with SlickNav.
  • For basic implementation it really is enough to download the SlickNav package from the web site, and follow the general instructions of usage.
  • Include the jquery.slicknav.js and slicknav.css files in your project, as instructed.
  • Remember to refer jQuery in your MasterPage along with the SlickNav files.
  • As for SharePoint, if using the OOB menus, there obviously is no ul with the id of "menu"; instead you can use "div.ms-core-listMenu-horizontalBox > ul.root" for the element selector and it works like a dream.
  • Remember to set the prependTo property for the initializing function, e.g.
    prependTo: '#mainnav'
  • I also found it useful to set the allowParentLinks property to 'true', so users can clikc on the parent links in a similar way as the regular SharePoint navigation
  • If you are using dynamic nodes in SharePoint navigation, you need to set the styles for
    .slicknav_open ul.dynamic {
       top:0;
       left:0; }

    in order to show the dynamic navigation; otherwise it is still hidden somewhere at left:9999px etc.
  • The dropdown tends to fall behind the page content, so set the styles for
    .slicknav_nav, .slicknav_nav ul {
        position: relative;
        z-index: 100; }
  • A varying amount of other css tweaking is needed to make it neat in SharePoint.
Still, I wouldn't say it was a really big issue to get the SlickNav up and working and even stylized nicely for the customer.


Mar 19, 2014

Discard AppWebs When Setting Custom MasterPages

I have long used a feature event receiver to set MasterPages throughout the webs (i.e. sites) in a site collection when my branding feature is activated, and also an inheritance event receiver to set the MasterPage for any new web when it has been provisioned. In SharePoint 2010, search sites required a different MasterPage than the rest of the sites, so in the code of the receivers, this was always taken into consideration, as you can see in the article linked above. In 2013, this is unnecessary as the same MasterPage goes for all sites, so I have used the simplified version of the receiver code, with no webtemplateid checks.

Or, so I thought. Turned out, my testing had been lacking, since I do not use apps in my development&test environment, and thus it had not occured to me, that the app webs (which I sort of assumed to be separate, but apparently are not) respond to these event receivers too. As tests proved, my receivers actually "broke the SharePoint" when appwebs were involved. So, a little improvement to both receivers here, checking that a web is not an appweb (APP#0, WebTemplateId == 17) before making any MasterPage changes:

Feature event receiver, activate feature:

SPSite site = properties.Feature.Parent as SPSite;
            if (site != null)
            {
                SPWeb topLevelSite = site.RootWeb;
                string WebAppRelativePath = topLevelSite.ServerRelativeUrl;

                if (!WebAppRelativePath.EndsWith("/"))
                {
                    WebAppRelativePath += "/";
                }

                foreach (SPWeb web in site.AllWebs)
                {
                    if (web.WebTemplateId != 17)
                    {
                        web.MasterUrl = WebAppRelativePath + "_catalogs/masterpage/mycustommaster.2013.masterpage.master";
                        web.CustomMasterUrl = WebAppRelativePath + "_catalogs/masterpage/mycustommaster.2013.masterpage.master";
                        web.Update();
                    }

                }
            }

Event receiver, web provisioned:

SPWeb newWeb = properties.Web;
            SPWeb topSite = newWeb.Site.RootWeb;
            if (newWeb.WebTemplateId != 17)
            {
                newWeb.MasterUrl = topSite.MasterUrl;
                newWeb.CustomMasterUrl = topSite.CustomMasterUrl;
                newWeb.Update();
            }
        }

For the sake of consistency, I also fixed the deactivate feature code to leave the appwebs alone.

Oct 15, 2013

Using Dynamic Navigation to Create a Static Subnavigation with a Little Bit of CSS and no JavaScript

Sometimes I tend to think too complicated. Working with a couple SharePoint navigation customizations involving e.g. a megamenu implementation (btw. I found this blog post highly helpful with that!), I was trying to accomplish something quite simple with a load of jQuery. Most certainly, that would have worked fine too, but when I, for a fleeting moment, wondered why it didn't (eh, I was still missing the jQuery reference), I realized I really did not need it at all.

In this particular case, I needed a two-level navigation, even though there was no real hierarchy, since everything was decidedly in one single team workspace. Yet, there was a logical hierarchy that had to be shown in the left hand side navigation. So, what I did after my futile jQuery excursion, was
  1. to create a hierarchical managed navigation, with the terms pointing to pages that otherwise would have been a flat list in the navigation. 
  2. to use the global navigation in place of the QuickLaunch as the left hand side navigation (in this case, it works much better)
  3. changed the navigation parameters to orientation: horizontal, static display levels: 1, maximum dynamic display levels: 1
  4. picked out the two CSS classes that make the dynamic navigation appear and dispappear:
    li.hover (hover being the class that SharePoint adds to the li.static.dynamic children on hover action)
    and li.hover-off (hover-off being the class that SharePoint adds to the mouseout action)
  5. using the classes above, I set the dynamic navigation to never appear as a dynamic submenu:

    li.hover ul.dynamic, li.hover-off ul.dynamic {
        display:none !important;
        left: -9999px !important;
    }
  6. then I set the dynamic menu of the selected static parent item to be displayed right below the parent item link:
li.selected ul.dynamic, li.selected.hover ul.dynamic, li.selected.hover-off ul.dynamic {
    border: medium none;
    box-shadow: none;
    color: #000000;
    display: block !important;
    left: 0 !important;
    padding: 0;
    position: relative !important;
    top: 0 !important;
}

With a little bit of other CSS modifications to the navigation items (for styling purposes), the menu then looked and behaved like this:


Sep 27, 2013

Inbuilt IE8 hack for SharePoint 2013

Doing yet another UI branding for a customer, and especially the optimzation for each and any Internet Explorer version from 8 on, I stumbled upon something quite interesting and useful too.

I mostly prefer the CSS rule hacks (e.g. using /9 for IE8) over comments and separate stylesheets and/or classes (read more about the options in Web Designer Wall), and try to come up with the most browser-generic solutions as possible. But IE8 is a problem child, that's for sure (fortunately, with SP2013 we don't need to deal with IE7 anymore!). 

The SharePoint team has obviously noted this too. So what I discovered today, when changing the color of the left side of the suite bar (id="suiteBarLeft") is this general class ms-core-needIEFilter that gets inserted to the page by some SharePoint JavaScript when the browser mode is Internet Explorer 8.

For example, this suiteBarLeft just happens to get an IE8 fix for its background, resulting in my custom background color not taking effect. And !important does not do the trick, for the overriding CSS rule is actually a filter rule, not background(-color) rule - which is there too, actually, set to transparent, so the complete fix for the suiteBar backgrouns customization is

.ms-core-needIEFilter #suiteBarLeft {
    filter:none;
    background-color: #92D050;
}


As stated, this class ms-core-needIEFilter exists globally (somewhere - I could not place the class in the DOM tree) on the SharePoint pages when browser is IE8, and thus is quite useful for any IE8 hacks that are needed in any custom UI. I tried out a few, and it works like a dream :)

Sep 18, 2013

Changing Site Logo URL with Client Side Script

In SharePoint, the site logo URL is set in the master page as the NavigateUrl  attribute for the SPLinkButton control, usually with the value of either ~site or ~sitecollection, e.g:
<SharePoint:SPLinkButton runat="server" NavigateUrl="~sitecollection/">

Most of the time this either is what we want, or can be changed in a custom master. 

Lately, though, I have been working on a project where the company intranet is split in two: there is one instance for general intranet, and another one for a special purpose. Both instaces use the same master pages, and the only UI customizations I have been making for the special site collection (in its own web app, not that it matters) are some special page layouts and CSS files - and a bit of JavaScript.

The incentive is to integrate the special site collection to the general intranet as seamlessly as possible, i.e. in a way that the average user wouldn't need to even notice that they actually navigate from one site collection to another and back. One task was to add an intranet root node to the breadcrumb trail, which did not cause too big of a headache, but the other task, changing the URL for the site logo link was not as straight forward as one would have expected.

The problem was created by the SharePoint control adding (invisible) empty text nodes inside the parent div. So while the <a> element seemed to be the firstChild of the div, this was not actually correct. Inspecting the dom tree of the div in Chrome dev console, I found this:


firstChild was trying to change attribute for the text node [0] and childNodes[1] returned empty object for whatever reason, so finally, the problem was solved rather simply by using children[0]:

window.onload = function setLogoUrl() {
    var logolink = document.getElementById('DeltaSiteLogo').children[0];
    logolink.setAttribute('href', 'http://intranet.mothership');
 }

May 14, 2013

Content Query Web Part Breaks Page Layout in SP2013

Content Search Web Part replaces Content Query Web Parts in SharePoint 2013 on many occasions. This probably is the reason why it has taken this long for me to discover this rather annoying SharePoint bug: Content Query Web Part breaks a page layout built with div-elements, because the default web part (or the XSLTs?) seems to miss a </div> closing tag!

Everything is ok in edit mode, for what ever additional wrapper reasons:


but when I click my way out of edit mode, the page breaks:


In FireBug, I added a </div> tag to the page's source code (which is perfectly ok when no CQWP is added to the page) and this fixes the problem:


In real life, this obviously won't do. So as a workaround, I added a table element to the Page Layout code, inside the div-elements as a wrapper for the web part zones: 

<div id="rightcolumn">
  <table width="100%"><tr><td>
    <div class="ms-webpart-zone ms-fullWidth">
    ...
    </div>
  </td></tr></table>
</div>

Not an especially pretty insert, but the easiest fix I came up with for now.

Apr 3, 2013

Accordion "Left Navigation" (Quick Launch) for SharePoint 2013

[Edit 7.3.2016: Since posting this, a lot has changed both in the browser and SharePoint world. This still works, at least in IE, but there have been a whole lot of issues with it. Thus I would urge you to consider the solution by MaxYakovenko instead of implementing this one (I am not attempting to solve the issues of this one anymore).]

One of my customers is working on their new SharePoint 2013 intranet site. They needed the Current Navigation (Foundation: Quick Lauch) to be an accordion. We tried a couple different jQuery code bits, but whereas they used to work in SharePoint 2010, in 2013 they only flashed the subnavigation instead of leaving it open.

Googling for one that would work with SharePoint 2013, I found a code snippet  in http://joao-pinho.blogspot.de/2012/11/sharepoint-2013-accordion-quicklaunch.html, but it did not do everything as intended (s.o. the links did not function anymore as the click was completely captured by jQuery). So, with a couple modifications:

$(function(){
 /*set dynamic css logic*/
 if($('#sideNavBox .menu-item.selected').length){
  //propagates the selected class, up the three.
  $('li.static').removeClass('selected');
  $('#sideNavBox .menu-item.selected').parents('li.static').addClass('selected');

  //collapses top siblings of selected branch
  $('#sideNavBox .menu-item.selected').parents('li.static').last().siblings()
   .find('> ul').hide();
 }
 else $('#sideNavBox .root.static > li.static > ul').hide();

 /*set accordion effect*/
 $('#sideNavBox .root.static > li.static').each(function(){
  if($(this).find('ul').length){
   $(this).addClass('father').click(function(){
    if($(this).children('ul').css('display') != 'none'){
     $(this).removeClass('selected').children('ul').slideUp();
    }
    else {
     /*collapse-siblings*/
     $(this).siblings().removeClass('selected').children('ul').slideUp();

     /*expand*/
     $(this).addClass('selected').children('ul').slideDown();
    }

    /*added: stop event propagation to link nodes*/
    $('a.static').click(function(event) {
        event.stopPropagation();
    });

    /*added*/
    return false;
   });
  }
 });
});

This piece of code assumes that the SharePoint navigation levels in the MasterPage are set to 3 static ones and no dynamic levels, the SiteMapProvider is CurrentNavigation, and the navigation settings in the sites are set to:

- SITE WHOSE CHILDREN FORM THE ACCORDION: Structural Navigation: Display only the navigation items below the current site, Show subsites

- ACCORDION HEADING LEVEL SITES (PARENTS):  Structural Navigation: Display the current site, the navigation items below the current site, and the current site's siblings, Show subsites

- ACCORDION SUB LEVEL SITES (CHILDREN):  Display the same navigation items as the parent site

Mar 26, 2013

How to Deploy Display Templates via SharePoint feature

[As to the question(s) "What are Display Templates, what have they eaten and how do I create my own?", see answer in the post The Anatomy of SharePoint 2013 Display Templates.]

Instead of adding my own Display Templates to a customer environment through Design Manager, I'd rather use a bit more controlled and less manual way of doing it, namely the same way as a I prefer when provisioning any branding files: Feature. A custom solution with a feature. As for how to create the branding solution base, please see Notes on Creating a SharePoint 2013 Branding Solution. This post will focus on the special issues of provisioning Display Templates.

While you still can create and provision MasterPages as .master files and PageLayouts as .aspx files, the Display Templates have been built for SharePoint 2013 solely using this HTML file -> conversion to *smtg* (in this case, .js file) technology. So even when using VisualStudio 2012 and features and such, we are working with HTML files that will be automatically converted once deployed to the _catalogs/masterpage Gallery.

Keeping that in mind, issue #1: adding the files to the solution

To add Display Template HTML files into your solution
  1. add a new module to your solution
  2. download a copy/copies of existing Display Template HTML files from the _catalogs/masterpage/Display Templated/Content Web Parts or Search directory, depending on which ones you need to create
  3. add the copies to the module and rename them
Issue #2: Display Template Properties

The properties for Display Templates are mostly set in the <head> section of the actual HTML file:


so don't define e.g. Title, ContentType, MasterPageDescription... in the Elements.xml. What you should add to the file in Elements.xml are the attributes Level and ReplaceContent. Level should be set to "Draft" in order to enable the .js conversion (it won't happen if the HTML file is published). ReplaceContent should be set to "TRUE" in order to enable the re-conversion when the file is modified and reprovisioned. And the usual Type="GhostableInLibrary" is needed too.

So this is how the basic Elements.xml would look for one Display Template only:
<Module Name="DisplayTemplates" Url="_catalogs/masterpage/Display Templates/Content Web Parts" RootWebOnly="TRUE">

<File Path="DisplayTemplates\Item_MyTemplate.html" Url="Item_MyTemplate.html" Type="GhostableInLibrary" Level="Draft" ReplaceContent="TRUE"/>

</Module>

Issue #3: the .js file after the conversion?

I found quite many references in the interwebs stating that it would be good to provision the (converted) JavaScript file together with the HTML file. If you do this, add the property
<Property Name="ContentType" Value="Display Template Code" />
to the file. 

Issue #4: publishing the Display Templates on feature activation

On activation, the feature provisions the files, and Master Page Gallery receiver code performs the conversions, but the files are still drafts.For guaranteed usability, the HTML files should be published. This can be done manually, but it can also be dealt with in a feature event receiver. The basis for this is that the HTML file be stamped to the feature by issueing it the Feature ID as a property in Elements.xml:

<File Path="DisplayTemplates\Item_MyTemplate.html" Url="Item_MyTemplate.html" Type="GhostableInLibrary" Level="Draft" ReplaceContent="TRUE">
<Property Name="FeatureId" Value="$SharePoint.Feature.Id$" Type="string"/>
</File>

Then, in the feature event receiver this can be used as an identifier by which to select the files to publish. My event receiver code is based on code provided by Waldek Mastykarz in his article Automatically publishing files provisioned with Sandboxed Solutions and looks like this:

 private string[] folderUrls = { "_catalogs/masterpage/Display Templates/Content Web Parts" };

        public override void FeatureActivated(SPFeatureReceiverProperties properties)
        {
            SPSite site = properties.Feature.Parent as SPSite;
            if (site != null)
            {
                SPWeb rootWeb = site.RootWeb;

                SPList gallery = site.GetCatalog(SPListTemplateType.MasterPageCatalog);

                if (gallery != null)
                {
                    SPListItemCollection folders = gallery.Folders;
                    string featureId = properties.Feature.Definition.Id.ToString();

                    foreach (string folderUrl in folderUrls)
                    {
                        SPFolder folder = GetFolderByUrl(folders, folderUrl);
                        if (folder != null)
                        {
                            PublishFiles(folder, featureId);
                        }
                    }
                }
            }
        }
        private static SPFolder GetFolderByUrl(SPListItemCollection folders, string folderUrl)
        {
            if (folders == null)
            {
                throw new ArgumentNullException("folders");
            }

            if (String.IsNullOrEmpty(folderUrl))
            {
                throw new ArgumentNullException("folderUrl");
            }

            SPFolder folder = null;

            SPListItem item = (from SPListItem i
                               in folders
                               where i.Url.Equals(folderUrl, StringComparison.InvariantCultureIgnoreCase)
                               select i).FirstOrDefault();

            if (item != null)
            {
                folder = item.Folder;
            }

            return folder;
        }
        private static void PublishFiles(SPFolder folder, string featureId)
        {
            if (folder == null)
            {
                throw new ArgumentNullException("folder");
            }

            if (String.IsNullOrEmpty(featureId))
            {
                throw new ArgumentNullException("featureId");
            }

            SPFileCollection files = folder.Files;
            var drafts = from SPFile f
                                  in files
                                  where String.Equals(f.Properties["FeatureId"] as string, featureId, StringComparison.InvariantCultureIgnoreCase) &&
                                  f.Level == SPFileLevel.Draft
                                  select f;

            foreach (SPFile f in drafts)
            {
                f.Publish("");
                f.Update();
            }
        }

Issue #5: Ah, this should pretty much cover it - get to work!

The Anatomy of SharePoint 2013 Display Templates

Display Templates, used in Search Results, Content Search Web Part and other search driven Web Parts to establish the visualization of the displayed data, are a combination of an HTML file and a JavaScript file. In order to create your own Display Template, you only need to modify the HTML file and let SharePoint handle the .js conversion. You can add your own JavaScript logic by referring to your own separate .js file in the HTML file.

The starting point is to copy one of the existing Display Template HTML files. Naturally, you want to start with one that is as close to your destined form as possible, so you can either try the existing ones out or check out the MSDN Display Template Reference.

As you can see in the reference (if you opened it), there are two basic types of Display Templates (Item and Control templates), plus the Hover template for the search results. As for the Control and Item templates, they are a loose pair. The Control template controls the basic structure where the data items will be injected, e.g. forming a list structure where the <li> element will be the repetitive element, diplaying data according to the selected Item template.


The actual Display Template files contain a bundle of HTML and JavaScript and jQuery. 

First of all, the <head>

Both Control and Item Display Templates contain their basic information, like the Title and the Description in the head section of the HTML file. 


The Item template also introduces the managed propert mappings used to retrieve the item metadata in the head section.


You can add Property Mappings and modify them, you can set default fields for data value retrieval or leave them empty.

Your own script or CSS

If you want to reference your own script or CSS style file, you can do that using the $includeScript or $includeCSS functions inside the <script> element in the body section, e.g.:


Item Display Template Variables

In the Item Display Template, you need to set the variables, the mapped properties before you can use them in HTML. This is done in the code section inside the body:


Item Display Template HTML

Then, you can edit the HTML to your liking, e.g.


Control Template Script and HTML

Control Templates contain a whole lot of jQuery & JavaScript to e.g. provide paging, and simply to provide the results. I did not find a reason to meddle with that, for now, but that can be customized as well.

The HTML structure is a bit scattered in the midst of the code, but you can find the element tags such as the <ul> start tag and add your own custom HTML within, e.g.


to provide headers for the item info.

With a little bit of CSS...

...the template with some custom data could look like this:


As for the deployment of these files?

You have two options:

1) Use the Design Manager. Map the -catalogs/masterpage gallery as a network drive, or use SharePoint Designer 2013 to work with the files. Once you have modified your Display Templates, upload them (the HTML files) and the possible support CSS and own script files to the MasterPage Gallery (select correct folder by intended usage, basically the same one you copied the file from). Check in Design Manager that the .js creation went ok. 

2) Use VisualStudio2012. Create a SharePoint solution to deploy the files via a feature. Notes on this in How to Deploy Display Templates via SharePoint feature.