Showing posts with label Development. Show all posts

May 4, 2016

SharePoint Dev Kitchen 2016

I was really happy when I heard that the embargo was being lifted on the current SharePoint development stuff, and I could finally tell the wolrd about the amazing SharePoint Dev Kitchen experience of this past March in Brussels. An invitation only -event for SharePoint dev community, the bootcamp was full of people with ideas, views and passion, and the core of the Microsoft SharePoint team.

The big meeting room was buzzing with electricity as we all settled into our seats to hear what the SharePoint team wished to share with us. The preparation emails had given but a little hint on what was happening in our SharePoint world. 

When the keynote ended, I felt a whoosh of delight. The SharePoint team was not only being candid with us but also looking to get feedback, thoughts and ideas from us who crowded the room. Still, the most exciting thing was the message [NOTE: this is purely PRE-RELEASE info]:

SharePoint is going towards more and more open source coding
Instead of doing a whole lot of behind the scenes closed-cirquit development, the SharePoint team has adopted the usage of JavaScript libraries and frameworks that enable the third-party developers to create add-ins and solutions for SharePoint with any JavaScript framework they wish to use.  
Mobile leads development
They were pretty clear on this one. All develoment is done mobile first. Not desktop first keeping mobile in mind but actually mobile first, then desktop experienve. 
SharePoint Home
If I had a euro for each time a customer has asked me: "But where's the SharePoint here in O365? There's only this Sites... is that it? But how do I find my workspaces if I haven't followed them?" As far as I understood, SharePoint Home will asnwer this question once and for all. It's where SharePoint is, it's where the workspaces are. 
A lot of nice new features are coming to SharePoint
Document libraries will get a bunch of new features. Publishing sites will get a new page model as an addition to the current one (i.e. the current publishing pages aren't going anywhere; your data is safe) with the feel of Sway to them - adding modules (or cotnrols or web parts, whatever the name will be) to a page canvas (or several). Publishing sites will get a gallery of these modules - new web parts - that are fully JavaScript based. 
Office UI Fabric
In addition to this new more open way of developing for SharePoint, Microsoft is providing a "fabric" of CSS and (HTML) controls for unified look and feel of any app or add-in that made for Office environments. It provides a grid for responsive design, fonts, animations etc. to be used freely - but no one is forcing it either.

One thing the Microsoft people really emphasized: the old way is not going away; this new model simply enable more.

Dev Kitchen was a very social three day "training". Sure, Microsoft people were giving sessions on what they are working on, the technologies that are used and there were hands-on labs to try out the things in a test environment. However, there was also a lot of discussion of ideas and questions and priorities and wishes and whatnot. There were a lot of people already getting their hands dirty with the new stuff, trying out real life scenarios and showing their work in demo sessions. 

Now the team is ready to come out with the stuff, but this is only the beginning. A lot is brewing in the SharePoint Dev Kitchen and it will be truly interesting to see the outcome! 

Oct 8, 2012

Getting Ready for SharePoint 2013 Development

With SharePoint 2010, you needed to have your development tools in the same environment as the SharePoint 2010 installation. With SharePoint 2013, one of the major improvements for a developer is that the SharePoint installation does not need to be in the same environment with the tools, i.e. Visual Studio 2012. Very good news, when the active SharePoint development environment is still the 2010 version, but you would need and want to be able to start getting aquainted with the 2013 already too.


Of course, you have the option to virtualize everything yourself, maintaining this all-in-one mentality in your development environment. If you are already in the Windows 8 era, you might be able to use Hyper-V as the virtualization platform, but VMWare works quite well for this purpose too. If you put up your own environment, the set of required software is pretty much the same as before, only the version numbers and/or SP-versions differ. You still need a 64x

  • Windows Server
  • SQL server instance (for stand-alone, express is ok)
  • SharePoint 2013 (currently Preview) pre-requisites
  • SharePoint 2013 Server or Foundation
Currently both Windows Server and SQL server are availble as 2012 versions, but the older ones go too, see detailed requirements in Technet Library. And remember to check the hardware requirements in the same article too.

The lighter option for a development environment is now, as stated, the option to have SharePoint elsewhere - e.g. a remote installation within your company, or you can utilize SharePoint Online for this! SharePoint Online is pre-configured to support testing and debugging; if you use a remote installation of your own, some additional configuration is needed:

Then, of course, you need the development tools on your own computer. These include:

You might need to install .net framework 4.5 before the installation of Visual Studio 2012, at least I needed to. VS2012 should be compatible with any Windows version since XP and Server 2003, but all of the components that come with it may not be. The Office development tool require Win 7 to be on SP1 level. For full compatibility and support list, see Visual Studio 2012 compatibility page.


Once your environment is all set up, just rock'n roll!


Sep 20, 2012

First Touchdown With Napa - Building Apps for SharePoint 2013

"Napa" is the new tool set for building cloud based apps for Office and SharePoint 2013, hosted in Office 365. Getting hands-on with it, I was quite impressed. See instructions for how to get started on the MSDN Office Developer site, where you can of course also find more detailed documentation on building the apps.

I signed up for my own developer site yesterday, and tried it out today for the first time. And I must say, it is a nice and fluent way of creating apps for SharePoint!

Once you have the site and Napa all set up in your development environment, you will find the Napa tools in the Site Contents:


After launching the tools, you can create a new app project with a couple clikcs, and later on, you will find all your apps here, in the Napa Tools.


You can create both different types of Office apps and SharePoint Apps by clicking Add New Project.


The most simple way to create your app is to do it right in the browser! The default SharePoint app has several sample files to get you started:


The references between these files have already been made, so add your stuff an click Run Project:


and Napa takes care of packaging and installing, and uninstalling the old version when needed.


Just to get a small taste of how this thing works, I did a couple small customizations to the project, like 
  • adding some text, an iFrame to display the web part, an a button on the default page

  • a little bit of JavaScript in the App.js file to display the web part on the page (displaying the initially hidden iFrame)
  • adding an editable paragraph in the web part 


  • and slightly changing the css style of the Web Part content and adding some styling for the button.


There is something of an intellisense and error checking in the browser editor too; not full, e.g. it will not supply you with intellisense for JavaScript (most editors don't), but it does give hints and notify about errors:


When this little demo is run, this is how it looks after clicking the button to display the Web Part:


If you want to, you can also open a copy of the project to VisualStudio for editing.

Jun 12, 2012

Working With Boolean (Checkbox) List Fields

While it is rather straightforward to retreive a value from a text field in code, the checkbox is a little bit more tricky, being a boolean field. 

Using boolean (checkbox) field in a CAML query 

To retreive items from a list with a CAML query, you use the elements <Eq> or <Neq>, as in equals to (Eq) or is not equal to (Neq), value. In Checkbox fields there is no actual value string touse in the CAML equasion, but the Value element is needed to state that the value is boolean, and thus the equal to comparison is made against TRUE/FALSE, namely whether value is false or not:
  • unchecked = false --> to retreive unchecked items, use <Eq>
  • checked = true --> to retreive checked items, use <Neq>
So the following CAML would return all the items where the NotDisplayed field ("Do not display in webpart") is not checked.

<Where><Eq><FieldRef Name='NotDisplayed'/><Value Type='Boolean'></Value></Eq></Where>

Using boolean (checkbox) field in code, to retreive or set the value

In your code you might need to determine whether the checkbox of a list item (or any list item) is checked or not in order to do something, e.g.

bool YesOrNoValue= (bool)item["YesOrNoField"];
if (YesOrNoValue == true)
{
   ...do something
}
else
{
   ...do something
}

If you need to retrieve the value to use it as a string, you need a slightly different approach:

SPFieldBoolean YesOrNo = item.Fields["Item value is yes?"] as SPFieldBoolean;
bool YesOrNoValue= (bool)YesOrNo.GetFieldValue(item["YesOrNoField"].ToString());

To set the checkbox value, you can use a simple

item["YesOrNoField"] = true;
item.Update();

May 14, 2012

Adding Properties to a Web Part

When you create web parts for SharePoint, you can give the content managers the possibility to set some properties for the web part. These properties need to be set in the beginning of the webpart class, e.g.

private int_numTiles;

[WebBrowsable(true), //needed for visibility in web part properties in browser
WebDisplayName("Number of tiles per row"), //set the display name for the property field
WebDescription("Number of tiles per row"), //description for the property
Personalizable(PersonalizationScope.Shared), //enables setting the property for the shared view
Category("Tile Settings") //create your own property group (instead of the default Miscellaneous)
]

public int numTiles
    {
            get { return (_numTiles); }
            set { _numTiles = value; }
    }

The property above would be a simple text box field. You can use different types of properties to collect the settings data needed:
  • string, int and DateTime are text fields
  • enum is a dropbox
  • bool is a checkbox
As for this particular case (that is, setting the number of tiles on a row in my Metro Tile Web Part) where the only possible number range that my web part would accept, the dropdown (enum) would be a better approach than a text box, or at least that way I can bypass the otherwise mandatory if-else (or property value check) by offering only the possible choices. The enum type in itself is a bit more work thatn the other properties, for you need to 
  • declare the enum type first:
    public enum TileEnum{One=1,Two=2,Three=3,Four=4,Five=5};
  •  then declare the property:
    private  TileEnum _numTiles;
    ...
    public  TileEnum  numTiles ...
  • and in this case, convert the value to int for use in switch
    int TilesPerRow = (int) numTiles;
    switch (TilesPerRow){
    Case 1:
         tileclass = "onetile";
         break;
    ...


[The article about creating the tile web part: Creating a Metro Tile Web Part]


May 3, 2012

Creating a Metro Tile Web Part

Metro style is the hot topic right now, so it is only right to take a look at how to make your SharePoint site more Metro too. You can build Metro blocks in the Content Editor Web Part, of course, but wouldn't it be so much easier to manage the tile content if the data was in a SharePoint list instead of being static content in a CEWP?


What you need in your (Empty SharePoint project) is
  • a List Definition and a List Instance for your source list - and I took it one step further by creating the Content Type for the list as well
  • the WebPart
  • your own CSS stylesheet in the mapped _Layouts folder
I am not going to go step by step through the process of creating these elements. For more info on creating SharePoint projects, webparts, content types, stylesheets etc. please check out some of my previous posts, e.g. in categories WebParts, Branding and Customization.

There's a whole lot of little things to do to put the thing together, and I will walk through the main points here.

For the Content Type (or the List Definition, if you are not creating a Content Type), you need to add the list fields and field references in its Elements.xml file. I used four fields in addtion to the Title field:
  • tile icon url field
  • tile content note field, setting the parameter HTMLEncode="true" to enable HTML tags in the content
  • tile background color (text) field for the background color as HEX code
  • tile url field (used to create a link wrapper around the icon and title)
In the ListDefinition Schema file you need to add the field references to the default view (BaseViewID 1) to show them in the AllItems view of the list. With the Fields and FieldRefs, remember that whether the tag has an endind tag or not really is of essence:
  • in Content Type Elements.xml both the Field and FieldRef tags are one-piece, eg:
    <Field Name="TileLink" DisplayName="Tile Hyperlink" ID="{GUID here}" Type="URL" Required="true"/>
    and
    <FieldRef Name="TileLink"/>
  • in List Definition Schema.xml the FieldRef inside the Content Type element is as above, but the FieldRefs in the View elements are two-piece:
    <FieldRef Name="TileLink">
    </FieldRef>
Also, remember to check the titles, descriptions and urls for the ContentType, ListDefinition and ListInstance, as well as the Web Part too, of course.

Once the list is done (and tested), add the Layout folder mapping to your project, and an empty CSS stylesheet in the project folder inside Layouts.

Then, add the WebPart to your project. In the WebPart .cs file, inside the CreateChildControls method, you need to
  • add the CSS reference
    If you are not trying to override corev4.css, this simple line is fine:
    CssRegistration.Register("/_layouts/MetroTileWebPart/TileStyles.css");
    and as for this project, this goes fine, since only our own classes need to be used. But if you need to make sure that the CSS is read after the corev4.css, see this blog post for the instructions.
  • retrieve the list items
    SPSite thisSite = SPContext.Current.Site;
    SPWeb rootsite = thisSite.RootWeb;
    SPList tilelist = rootsite.Lists["MetroTilesList"];
    SPListItemCollection items = tilelist.GetItems();
  • loop through the items 
    A foreach loop is fine. 
  • get field values for each item
    For any e.g. string type data (here the color and the content) you can use:
    string tilecontent = item["TileContent"].ToString();
    But if you try this with the hyperlink fields, due to the Description field embedded in it, you will get a double hyperlink value, separated by a comma, and that won't work. So you need to use the SPFieldUrlValue to get only the url value:
    SPFieldUrlValue TileUrlvalue = new SPFieldUrlValue(item["TileLink"].ToString());
    string tileurl = TileUrlvalue.Url;
    As for the title, you can simply refer to it with item.Title.
  • and create the html for the webpart
    Using LiteralControls you can quite easily create the HTML for each tile, using the field values in the places needed:

And then you need to create the CSS for the classes. The key points in the CSS here being:
  • the main element here is the tilecontainer, and for this 3 in a row, my CSS rules for it are:
    width:30%;
    padding: 10px;
    float:left;
    margin: 5px; /* to create a consistent 10px space between tiles */
     
  • using the pseudo-element :nth-type-of(N), you can make the n:th (in this case the fourth) tile position itself neatly below the first tile instead of e.g. below the last tile of the row, if the tiles differ in height:
    div.tilecontainer:nth-of-type(3n+1) {clear: left;}
  • the background of the content span is white opaque so that it sits nicely with which ever color tile, but the IE7 and IE8 don't understand the rgba-rule, so I set the background as #dedede for them:
    background: rgba(255, 255, 255, 0.4);
    *background: #dedede;
Otherwise, the CSS is all about the positionings and colors and margins etc. of the contents of the tiles.

For more info on Metro style UX desing, see: http://msdn.microsoft.com/en-us/windows/apps/.

[See also: Add Properties to Your Web Part]

Jan 19, 2012

Creating a Content Type for Custom PageLayouts

Even when you don't use any custom fields on your PageLayouts, and necessary if you do, it is worth its while to create a custom content type (or several, if you need to apply different fields to different PageLayouts) for your PageLayouts for several reasons:

  • custom content type enables grouping the PageLayouts in meaningful groups instead of the Custom group in the PageLayout menu
  • also, for content rollup with CQWP, with custom content type, it is possible to list only the pages that are of the specific content type
  • when using custom fields as well, it is possible to filter the content rollup by the custom field info

Creating the basic Content Type is a quick task. Add a new item to your SharePoint project, of the type Content Type:


Select then "Page Layout" as the base Content Type to inherit from, or one of your existing Content Types:


Edit the Elements.xml; change the Name, Group and Description to your liking.


If you want to create some custom fields for your content types, add the fields to the Elements.xml as Field-elements:


Generate GUIDs for the IDs of the fields.

Then add the field references to the Content Type FieldRefs. After that the Elements.xml should look something like this:


Now, to use this with your PageLayouts, first, set the Content Type of the PageLayout to your custom Content Type in the Elements.xml containing the PageLayout elements by setting the Content Type value and adding a PublishingAssociatedContentType-property with the ContentType ID to the file(s):


If you want to make it easier for the users to fill in the fields, add them to the PageLayout EditPanel:


FieldName gets the GUID ID you generated for the field. 

And maybe some information needs to be visible too, add those fields to the page html as well:


In edit mode, the page looks now like this: 


The Content owner is visible on page (and a bit stylized here):


(Page content from http://slipsum.com, my favorite Lorem Ipsum.)

Jan 18, 2012

Creating a Custom UI Solution for SharePoint

To create a custom UI solution for SharePoint 2010, create a new project in VisualStudio2010, using the project template Empty SharePoint Project. Remebmer to set the Framework to 3.5!


Next steps are to the SharePoint SiteCollection you are using for testing, and to choose between Farm or Sandbox solution. I usually use the Farm Solution unless Sandboxing is required, because I prefer the Layouts folder for the stylesheets and images over the Style Library of an individual SiteCollection. Sandbox solution does not have access to the Layouts folder.

After the project has been created, add the mapping of the Layouts folder if you are creating a Farm solution:


or add a new module with the name StyleLibrary if you are creating a Sandbox solution:


Mapping the Layouts folder automatically creates a folder for your custom stylesheets etc. Inside this folder, create another one, Images.


The StyleLibrary module needs the same, so create a folder for your custom stylesheets, and one for the Images too. Also, delete the Sample.txt file from the module, it is not needed. 

Add a stylesheet to the UI.Assets folder, New Item > Style Sheet from the Web category:


If you are using the StyleLibrary, you need to check your Elements.xml now. The Module-node should look something like this:

Module Name="StyleLibrary" Url="style library"
File Path="StyleLibrary\Showcase.UI.Assets\SandboxSC.core.css" Url="StyleLibrary/Showcase.UI.Assets/SandboxSC.core.css"

When you add images in the Images folder, check your Elements.xml file if using the StyleLibrary. There should be a new File-element for each image, e.g.

File Path="StyleLibrary\Showcase.UI.Assets\Images\Logo.gif" Url="StyleLibrary/Showcase.UI.Assets/Images/Logo.gif"

Next let's add the MasterPages module. If you have installed the CKSDev tools, you can add a new CKSDev MasterPage (in this case, see more about using the CKSDev Starter Master Page), or add a new empty Module and name it MasterPages, in a similar way as the StyleLibrary module was added. Again, delete the Sample.txt file.

Add a starter MasterPage file to the module. You can use any OOB SharePoint MasterPage as a starting point (download a copy from the MasterPages Gallery), but I highly recommend to start with the a starter MasterPage from the Starter MasterPages by Randy Drisgill. There are starter files for publishing sites and foundation sites, pick the correct one for the correct purpose. 

To better understand the usage and inheritance of SharePoint 2010 MasterPages, see About SharePoint 2010 MasterPages.

After adding the first MasterPage, rename it if needed and then edit the Elements.xml file:


First thing to do with the newly added MasterPage is to create (or change) the custom CSS reference. In the starter MasterPages, this is ready for you:


When using the StyleLibrary, the reference would be like this:


Last thing before initial testing of the solution is to prepare our feature. Two things: rename it and set the scope. First rename the feature in the solution explorer, then double-click it to set the title and the scope:
  • Web, if the feature should be activated separately on each site - good for cases where not all sites need the same UI assets, or you want to activate the UI by using feature stapling with custom site templates
  • Site, if the feature should be used for the whole SiteCollection - only one activation required, for efficient use, create also a feature receiver and an event receiver for when sites are created

The base for the branding solution has now been laid.and the solution is ready to be tested. Right-click on the project name in the solution explorer and click Deploy. This both deploys the solution and activates the feature. When deploy is done, go to your site and set the MasterPage for the site - and start working with it! 

Since I do not use SharePoint Designer for any UI customizing, I need to deploy, re-deploy and so forth, the solution as I make changes. My method is to deploy the initial solution, as it is, and then start working with the sites in Firefox, using Firebug to try out the css when necessary before writing it in the css file. And of course the MasterPage needs a whole lot of html! The easiest way to apply changes to the SharePoint site after the initial deploy, is to use the Quick Deploy tool of the CKSDev tools.

When it is time to add PageLayouts, add a new module like with MasterPages. Download a copy of the most suitable OOB PageLayout from the MasterPages Gallery, and add the file to the module. Edit the Elements.xml; for one PageLayout should look something like this:


For information on creating a feature receiver and event receiver for a UI solution, see Setting MasterPages to Sites Automatically.

Jan 4, 2012

Building a Custom ContentQueryWebPart

Since I have just gone through building my first custom CQWP for a publishing site collection, step by step, thought I'd share some notes on it. It's basically really not too complicated, but it does have a few quirks to go with it.

ContentQueryWebPart uses two main xsl-files:
  • the ItemStyles.xsl for item templates
  • the contentquerymain.xsl for the outer templates
Most often what you would be interested in customizing, is the ItemStyles.xsl which is located in the Site Collection Style Library, in the XSL Style Sheets folder. This provides the templates for items in the query result, enabling you to e.g. add fields to show, alter the order of fields and add additional html and style classes to item templates. This, of course, requires knowledge of xsl, how deep depends on what you are trying to do.

The first thought might be "ok, I'll open the ItemStyles.xsl to SharePointDesigner and edit it". I say no, you don't. You open the ItemStyles.xsl to SharePoint Designer and copy all its content and paste it to an xsl file in VisualStudio. But wait! We're not that far along yet, so let's back up a bit.

Yes, the correct way to do this is to create a VisualStudio 2010 project and package it as a wsp solution package. So start by creating an Empty SharePoint (2010) Project (remember to check that your Framework is set to 3.5). 


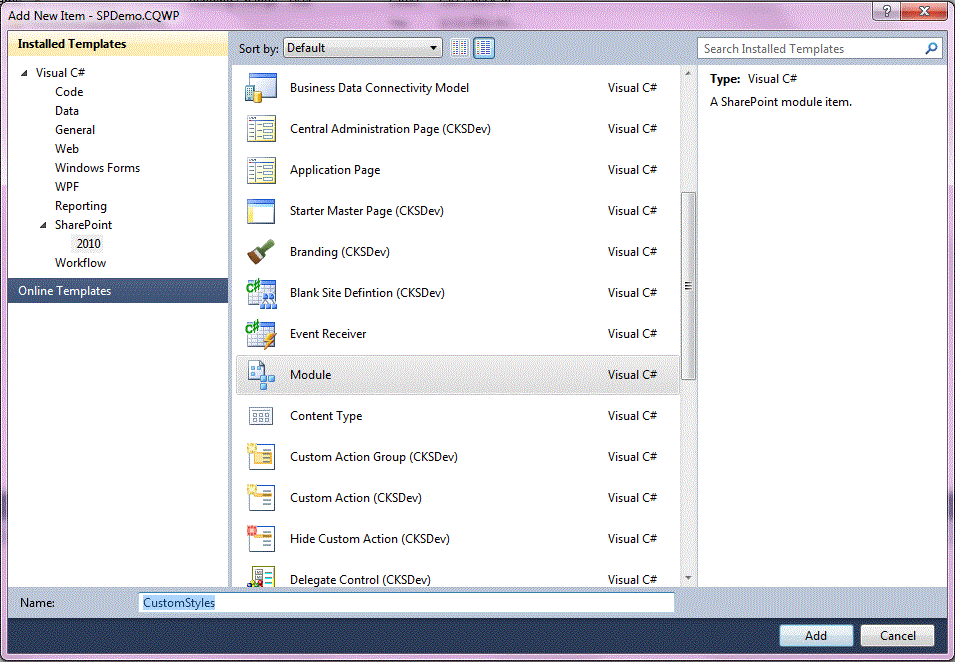
Type a site to use as test site and select the solution type (either one is ok, sandbox or farm). Add a module (Add > New item) in the project:


Delete the Sample.txt file and add a new item to the module:


Note, the item added is xslt-file (from Data category), remember to change the file type to xsl, e.g. CustomItemStyles.xsl.

Open the Elements.xml file of the module and edit the module information by adding the Style Library as the Url for the module and XSL Style Sheets folder as the Url of the item:


Now it is time to locate the original ItemStyles.xsl and open it for editing in SharePointDesigner. There is no need to check it out since there is no need to edit it, simply copy the contents of the file and paste them to the xsl file just created in VisualStudio. VisualStudio will notify (as an error) that the named template OuterTemplate-etc. does not exist, but don't mind this. The OuterTemplates are defined in the contentquerymain.xsl, which will be available for the custom CQWP without needing to copy it to the project.

Now what we ought to do, is select one of the existing templates as the basis for the custom one - this saves a whole lot of work. So if you're not sure which is a good starting place, insert a CQWP on your site and try out the different OOB templates. Then locate the template you want to modify, copy the complete template tag and paste it on the xsl sheet as a new template tag. Modify it as you like - you can move the divs around and create your own (remember to assign a class for your div!), but be mindful to maintain the schema and general structure of the template!

Now, the item template being done, it is time to add the webpart in the project. The OOB CQWP does not know how to use the custom xsl and there is no way to implement it, so we need to create our custom CQWP as well. Add a SharePoint webpart item in the project:


You don't need the webpart's .cs-file, so you can delete that. Then open the browser again, add a new CQWP on a page and export the webpart without setting any properties. Once saved on your disc, open the webpart file and copy and paste its contents to the webpart file in VisualStudio, replacing the default content created by VS.

Change the title of your webpart:


Then locate the properties ItemXslLink and ItemStyle and set them to point to the custom xsl:


Yes, that's right: no slash between ~sitecollection and Style Library.

Furthermore, if you want to make things neat, you might want to change the category in which the webpart is found on the site. The deafult is Custom, but you can change it by opening the Elements.xml file of the webpart and typing your own group name:


Ok, now we're almost done. The last thing to deal with is the features. Adding the module created a feature and adding the webpart created another one. There is no need for two features, so you can delete the other one. The clue is to delete the right one. Double click on each feature to see its properties. The first one only contains the styles module, the second one shows both modules (although you need to add the styles module to the feature items). Delete the first one, and add the styles module to the other one. 

Also, you might want to rename the feature. One thing is to rename the feature in the feature properties and the other to rename the feature file in the solution explorer (right-click the feature > Rename). You might want to do both.


The final thing to do, is add a feature event receiver. Why? Because for some reason at least a publishing site collection otherwise refuses to let the custom CQWP use the custom xsl file, informing that it is not trusted. So this feature receiver corrects this problem by specifically assigning the sitecollection url for the webpart.

Right click your feature and add an Event Receiver to it. Open the event receiver for editing, uncomment the FeatureActivated method and add the following code to the method, changing the wp.File.Name value to your own webpart name.


(Thanks for the feature receiver goes to our coder, couldn't have come up with it myself!)

Note that you need to add the using statements for System.Linq and System.Text.

You're solution tree should now look like something this:


Now you are ready to package, deploy and test the webpart! 

Tip: If you need to do this more than once, which usually is the case, the easiest way to make it happen is to copy-paste the original xsl and webpart files to your disc drive (or such). Then you don't need to always do the same opening and copying all over again.