1) Create your HTML structure
You can create the basic structure of the master page in any HTML editor of your liking, more or less forgetting about the SharePoint aspect altogether. I say more or less, not completely, because you need to understand what a MasterPage is, essentially, what its function is.
A MasterPage contains the basic structure of the pages, the wireframe of where elements are on every page. In SharePoint, it can also contain some controls like navigation and site logo and search. These controls are later added as snippets to the MasterPage. What you need to do now, is create the wireframe as an HTML page.
Example (HTML5):
<!DOCTYPE html>
<html>
<head>
<meta charset="utf-8" />
<title></title>
<link type="text/css" href="DemoStyles.css" />
<link type="text/css" href="DemoStyles.css" />
</head>
<body>
<header>
<div id="sitelogo">[site logo control here]</div>
<div id="headerright">
<div id="subtitle">Company A Intranet</div>
<div id="searcharea">[search control here]</div>
</div>
</header>
<nav>[top navigation control here]</nav>
<section id="mainarea">
<nav>[left navigation control here]</nav>
<div id="pagebody">
[ContentPlaceHolderMain here]
</div>
</section>
<footer>
<span>Company A Intranet</span>
</footer>
</body>
</html>
2) Create your CSS stylesheet (and graphics etc.)
You can test your site UI by adding the references to your stylesheet (and graphics) on the HTML page while still stored in your filesystem; simply change them later if the relative paths change after uploading everything to the server.
3) Upload your files to the server
Navigate to the top level site settings in your SharePoint Site Collections and open the MasterPages library under Web Designer Galleries category. Click Upload Document in the Ribbon, and browse for your HTML file and click Upload. Select HTML MasterPage as the Content Type of the file.
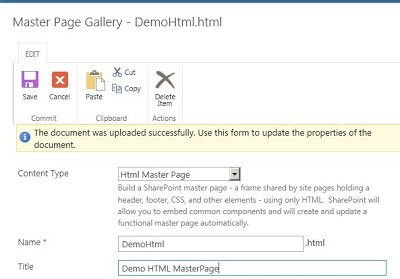
You can also add your CSS Stylesheet reference in the information form.

Upload your stylesheet and graphics as Design Files. You can create a separate folder for them too.

4) Convert your HTML file into a MasterPage
Navigate to the Design Manager in Site Settings, under Look and Feel and select Edit Master Pages. Note your HTML MasterPage in the list.

It still needs to be converted into a .master MasterPage, so click on Convert an HTML file to a SharePoint master page and select your MasterPage from the gallery.

Click Insert and SharePoint will convert your HTML page into a MasterPage, showing the MasterPage status as "Conversion successful".
Click on your MasterPage to open it in Preview.
5) Open your HTML MasterPage file for editing
You can either download a copy of the converted .html file from the MasterPages gallery or open the Top Level Site for editing in SharePoint Designer 2013 where you can edit the file on the fly and see the changes in the preview right away.

In SharePoint Designer: click to open the file, then click the Edit file -link.
You can see that with the conversion, SharePoint added a whole lot of code in the HTML version of the file in addition to creating the .master file. Do not delete the code added by SharePoint!
6) Add snippets to your .html MasterPage
In the browser, open the file in Preview, if you did not do this yet. Then, click on Snippets in the upper right hand corner of the Preview page.

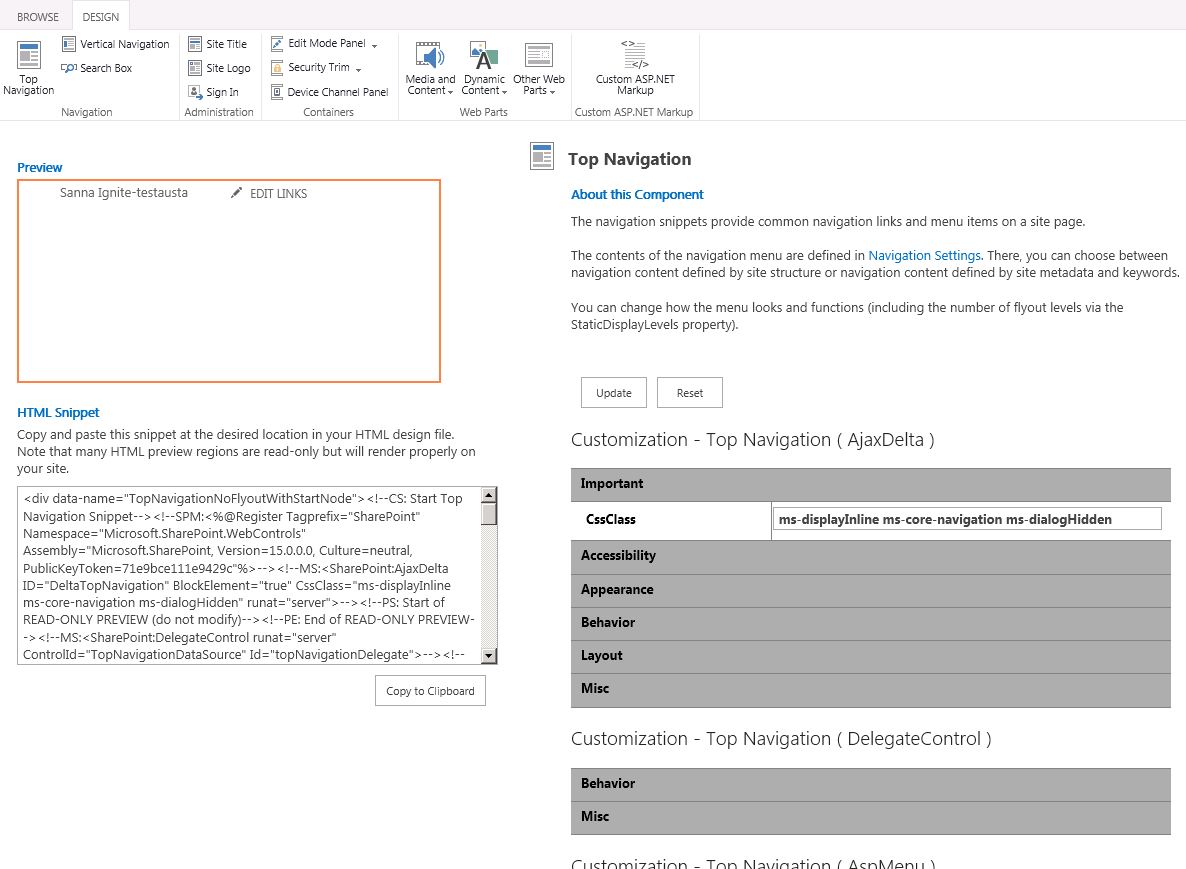
This opens a new tab in the browser for selecting and customizing the snippets, i.e. the SharePoint controls.

Pick the snippet on the Ribbon, customize it as needed, then click on Copy to Clipboard and paste the code in the appropriate place in the HTML file.

If you are working in SharePoint Designer, save changes and refresh Preview to view the changes made by insterting the snippets.
When you are ready, save and close the HTML file and return to Design Manager in the browser.
7) Publish your design files
Navigate to the MasterPages gallery and publish your files. Your MasterPage is ready to be used.
You can test your site UI by adding the references to your stylesheet (and graphics) on the HTML page while still stored in your filesystem; simply change them later if the relative paths change after uploading everything to the server.
3) Upload your files to the server
Navigate to the top level site settings in your SharePoint Site Collections and open the MasterPages library under Web Designer Galleries category. Click Upload Document in the Ribbon, and browse for your HTML file and click Upload. Select HTML MasterPage as the Content Type of the file.

You can also add your CSS Stylesheet reference in the information form.
Upload your stylesheet and graphics as Design Files. You can create a separate folder for them too.

4) Convert your HTML file into a MasterPage
Navigate to the Design Manager in Site Settings, under Look and Feel and select Edit Master Pages. Note your HTML MasterPage in the list.

It still needs to be converted into a .master MasterPage, so click on Convert an HTML file to a SharePoint master page and select your MasterPage from the gallery.

Click Insert and SharePoint will convert your HTML page into a MasterPage, showing the MasterPage status as "Conversion successful".
Click on your MasterPage to open it in Preview.
5) Open your HTML MasterPage file for editing
You can either download a copy of the converted .html file from the MasterPages gallery or open the Top Level Site for editing in SharePoint Designer 2013 where you can edit the file on the fly and see the changes in the preview right away.

In SharePoint Designer: click to open the file, then click the Edit file -link.
You can see that with the conversion, SharePoint added a whole lot of code in the HTML version of the file in addition to creating the .master file. Do not delete the code added by SharePoint!
6) Add snippets to your .html MasterPage
In the browser, open the file in Preview, if you did not do this yet. Then, click on Snippets in the upper right hand corner of the Preview page.

This opens a new tab in the browser for selecting and customizing the snippets, i.e. the SharePoint controls.
Pick the snippet on the Ribbon, customize it as needed, then click on Copy to Clipboard and paste the code in the appropriate place in the HTML file.

If you are working in SharePoint Designer, save changes and refresh Preview to view the changes made by insterting the snippets.
When you are ready, save and close the HTML file and return to Design Manager in the browser.
7) Publish your design files
Navigate to the MasterPages gallery and publish your files. Your MasterPage is ready to be used.
73 comments:
Post a Comment