To create a custom UI solution for SharePoint 2010, create a new project in VisualStudio2010, using the project template Empty SharePoint Project. Remebmer to set the Framework to 3.5!
Next steps are to the SharePoint SiteCollection you are using for testing, and to choose between Farm or Sandbox solution. I usually use the Farm Solution unless Sandboxing is required, because I prefer the Layouts folder for the stylesheets and images over the Style Library of an individual SiteCollection. Sandbox solution does not have access to the Layouts folder.
After the project has been created, add the mapping of the Layouts folder if you are creating a Farm solution:
or add a new module with the name StyleLibrary if you are creating a Sandbox solution:
Mapping the Layouts folder automatically creates a folder for your custom stylesheets etc. Inside this folder, create another one, Images.
The StyleLibrary module needs the same, so create a folder for your custom stylesheets, and one for the Images too. Also, delete the Sample.txt file from the module, it is not needed.
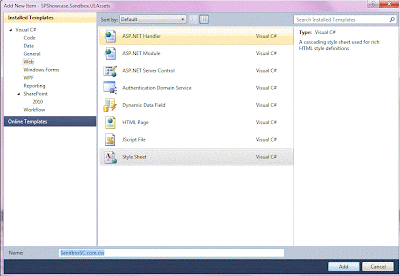
Add a stylesheet to the UI.Assets folder, New Item > Style Sheet from the Web category:
If you are using the StyleLibrary, you need to check your Elements.xml now. The Module-node should look something like this:
Module Name="StyleLibrary" Url="style library"
File Path="StyleLibrary\Showcase.UI.Assets\SandboxSC.core.css" Url="StyleLibrary/Showcase.UI.Assets/SandboxSC.core.css"
When you add images in the Images folder, check your Elements.xml file if using the StyleLibrary. There should be a new File-element for each image, e.g.
File Path="StyleLibrary\Showcase.UI.Assets\Images\Logo.gif" Url="StyleLibrary/Showcase.UI.Assets/Images/Logo.gif"
Next let's add the MasterPages module. If you have installed the CKSDev tools, you can add a new CKSDev MasterPage (in this case, see more about using the CKSDev Starter Master Page), or add a new empty Module and name it MasterPages, in a similar way as the StyleLibrary module was added. Again, delete the Sample.txt file.
Add a starter MasterPage file to the module. You can use any OOB SharePoint MasterPage as a starting point (download a copy from the MasterPages Gallery), but I highly recommend to start with the a starter MasterPage from the Starter MasterPages by Randy Drisgill. There are starter files for publishing sites and foundation sites, pick the correct one for the correct purpose.
After adding the first MasterPage, rename it if needed and then edit the Elements.xml file:
First thing to do with the newly added MasterPage is to create (or change) the custom CSS reference. In the starter MasterPages, this is ready for you:
When using the StyleLibrary, the reference would be like this:
Last thing before initial testing of the solution is to prepare our feature. Two things: rename it and set the scope. First rename the feature in the solution explorer, then double-click it to set the title and the scope:
- Web, if the feature should be activated separately on each site - good for cases where not all sites need the same UI assets, or you want to activate the UI by using feature stapling with custom site templates
- Site, if the feature should be used for the whole SiteCollection - only one activation required, for efficient use, create also a feature receiver and an event receiver for when sites are created
The base for the branding solution has now been laid.and the solution is ready to be tested. Right-click on the project name in the solution explorer and click Deploy. This both deploys the solution and activates the feature. When deploy is done, go to your site and set the MasterPage for the site - and start working with it!
Since I do not use SharePoint Designer for any UI customizing, I need to deploy, re-deploy and so forth, the solution as I make changes. My method is to deploy the initial solution, as it is, and then start working with the sites in Firefox, using Firebug to try out the css when necessary before writing it in the css file. And of course the MasterPage needs a whole lot of html! The easiest way to apply changes to the SharePoint site after the initial deploy, is to use the Quick Deploy tool of the CKSDev tools.
When it is time to add PageLayouts, add a new module like with MasterPages. Download a copy of the most suitable OOB PageLayout from the MasterPages Gallery, and add the file to the module. Edit the Elements.xml; for one PageLayout should look something like this:
For information on creating a feature receiver and event receiver for a UI solution, see Setting MasterPages to Sites Automatically.


2 comments:
Excellent! Thanks for the explanation of CKS and the various little things they don't tell you about master pages and the difference between Sandboxed and Farm solutions!
Thanks Mark P, glad that you found it helpful :)
Post a Comment